Blood Orange and Rosemary Cake

February 1st, 2013

This has been a difficult post to write.  I just deleted my original first paragraph that was full of disillusionment in this recipe and the way I executed it.  I literally thought I had “executed” the cake.  But after time away from the results and taste testing a few times, I feel better about the cake and can pass on a few tips to you to make it better than my experiment.

This Blood Orange and Rosemary Cake is featured in my new favorite cookbook What Katie Ate.  Katie Quinn Davies is an Irish transplant to Australia and is a very talented photographer and food blogger with a blog of the same name.  I was transfixed by the picture of this cake in her cookbook.  The blood oranges leant a beautiful bright pink to the frosting on her cake.  I knew it would be one of the first recipes I would make.  But I had to wait until blood oranges were in season.  They finally arrived at our supermarket this week.

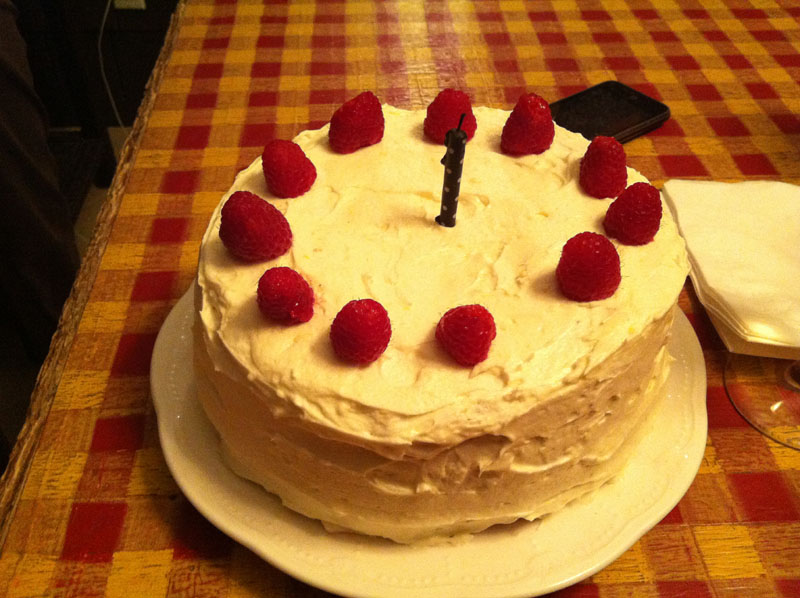
I followed the recipe to a tee.  I noted that the three eggs that were listed in the ingredients were not mentioned in the written directions.  But I pretty much know when to add eggs to a batter.  I also discovered that you can go to this page on the internet to find the corrections to the cookbook.  I felt like 400 degrees was too hot to bake a cake.  I was right, especially in my oven.  Before I could rescue the cake the edges were blackened.  In my photos you can see that my cake looks like chocolate.  That is actually scorched batter.

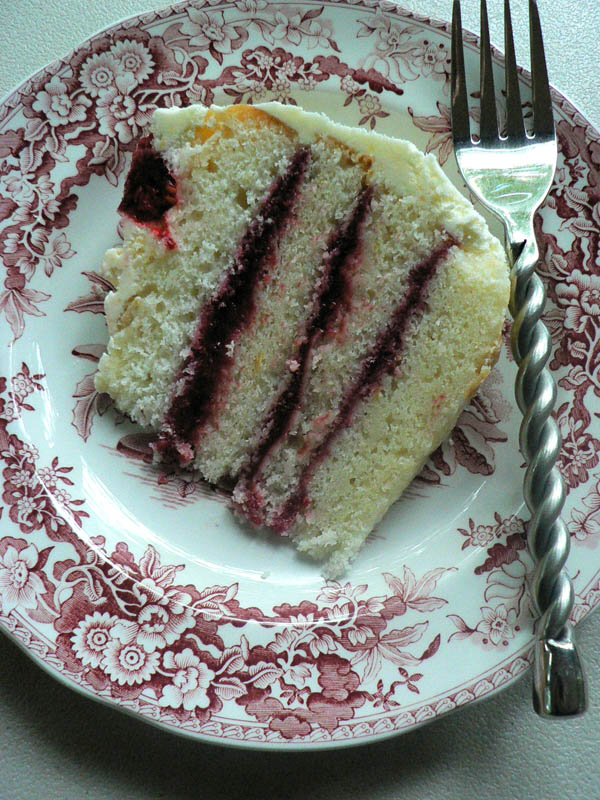
When I poured the orange syrup over the cake the pulp in it stayed on the top and made funny ridges under the too runny frosting that I added later.  Straining it in a fine sieve would have been a good idea. Also the color of the frosting was not as vibrant as I would have liked so I added more blood orange juice, which thinned the frosting too much.  That was the only diversion from the recipe.  So I learned a lot.  The texture of the cake is good.  When I first tasted it, I thought the rosemary was a bit overpowering.  The directions call for three sprigs of rosemary.  How large are the sprigs?  I think mine were too large.  But after an hour or two David said “You know, this cake is growing on me”.  I began enjoying it too and feel that it has great potential.  It makes a great, not too sweet, treat with tea or coffee.  I had a piece for breakfast this morning.  So here it is- not looking as great as Katie’s cake.

But I do want to try it again.  Here is the recipe if you would like to give it a try.  I’ve added my changes in italics.

BLOOD ORANGE AND ROSEMARY CAKE

2 sticks unsalted butter, softened
1 cup superfine sugar – 1 cup sugar
2 teaspoons cointreau – triple sec
3 large eggs
1 blood orange, peeled, pith removed and cut into segments
1 orange, peeled, pith removed and cut into segments
3 sprigs rosemary, leaves picked – 2 tablespoons
2 cups all-purpose flour, sifted
2 teaspoons baking powder, sifted

Blood Orange Syrup:
Juice of 2 blood oranges – strain through fine sieve
Juice of 2 oranges – strain through fine sieve
1 tablespoon sugar

Blood Orange Frosting:
Juice of 1 blood orange
2 cups confectioners’ sugar, sifted

Preheat the oven to 400 F ( I would recommend 350 F).  Grease a 6 cup capacity bundt pan (alternatively, grease and line a 9-inch sprinform cake pan).

Use an electric mixer to cream the butter and sugar for 10 minutes until light and creamy.  Add the Cointreau (Triple Sec) and the 3 eggs beaten and beat until combined.

Whizz the blood orange, orange and rosemary in a food processor until the rosemary leaves are finely chopped and the oranges are blended to a pulp.  Add to the butter and sugar mixture and beat together on low speed until combined.

In a separate bowl, mix together the flour and baking poser.  With the mixer on low speed, gradually add the flour mixture to the butter until everything is well incorporated.

Pour the cake batter into the prepared pan.  Bake for 45-50 minutes or until the top is golden and a skewer inserted into the center comes out clean.

Meanwhile, to make the blood orange syrup, place the ingredients in a saucepan and bring to a boil, stirring constantly.  Reduce the heat to medium and simmer, stirring occasionally, for 10-15 minutes or until the sugar has dissolved and the syrup has reduced by about a third.  Strain syrup through a fine sieve and return to saucepan and keep warm while cake is baking.

Leave the cake to cool a little before transferring it to a wire rack.  Place a plate underneath the rack to catch any drips, then prick the top of the cake with a skewer, spoon the warm syrup over the cake and leave it to be absorbed.

Make the frosting by combining the blood orange juice and confectioners’ sugar until smooth.  Drizzle the frosting all over the cooled cake, then chill the cake in the fridge for 20 minutes before serving.

Printable recipe


Raspberry Financiers

January 24th, 2013

While we were in Paris last summer I bought a silicone financier pan from Dehillerin, the iconic kitchen supply store.  I have regretted not buying the individual financier tin molds ever since.  Financiers are small cakes made in Paris bakeries in the shape of gold bars.  They were originally sold in the financial district to busy businessmen who wanted a quick snack on the go, since when you have an LLC is important to learn how to manage your time and employees. 

I have a friend here in Florida whose mother was an expert chocolate maker.  Stephanie inherited all of her mother’s chocolate molds.   I was describing the rectangular financier molds to her and she said that she would look through her collection to see if she had any.  To my surprise and delight I received this gift from Stephanie.

The fluted molds are so beautiful.  I feel honored that she wanted to share them with me.  Stephanie’s  mother was not only an exceptional baker, she was also a hat model in New York City.  Looking at Stephanie,with her beautiful sculpted cheek bones and wide smile, I can understand why her mother’s visage would be perfect for modeling hats.  Does anyone model hats anymore?  I doubt it.

Traditionally financiers are made with browned butter, almond meal and confectioner’s sugar.  That combination makes a delicious cake.  I have become addicted to them.  You can make your own almond meal by grinding almonds into a fine mix or you can buy almond meal at most health food or specialty grocery stores.  You can make them plain or add fruit such as raspberries or blueberries to the top.  I have even made a savory financier using sage leaves and walnuts.  See that recipe here.  This recipe came from Joy of Baking and there is a great video included with the recipe.

RASPBERRY FINANCIERS (From Joy of Baking)

1/2 cup unsalted butter
1/4 cup all purpose-flour
1/2 cup ground almonds (can use almond meal/flour)
3/4 cup confectioners (powdered or icing) sugar, sifted
1/8 teaspoon salt
3 large egg whites, lightly beaten
1/2 teaspoon pure vanilla extract

Fresh berries (optional)

Preheat the oven to 400 degrees F (200 degrees C) with the oven rack in the center of the oven. Place 12 rectangular or boat shaped tartlet molds (each holds about 2 tablespoons of batter) on a baking sheet. (Can also use mini muffin cups.)

Place the butter in a small light colored saucepan over medium heat. Once the butter has melted let it come to a boil, swirling the pan occasionally. As it boils you will notice that a foam will appear on the butter’s surface. Continue to cook the butter until it looks clear and the milk solids have dropped to the bottom of the pan and have turned golden brown. Remove from heat and immediately pour through a cheesecloth-lined strainer. Let cool to room temperature. You will need 1/3 cup (80 ml) of brown butter. Use the leftover brown butter to butter the molds (use a pastry brush).

In a large bowl whisk together the flour, ground almonds, confectioners sugar, and salt. Make a well in the center and fold in the lightly beaten egg whites, vanilla, and the brown butter. Fill each mold almost to the rim and bake for about 4 minutes (batter is set around the edges but still soft in the center). Remove from the oven and gently place one or two fresh raspberries on top of each. Bake a further 5-7 minutes or until the Financiers have become golden brown around the edges and are springy to the touch. Remove from oven and let cool on a wire rack. These are best eaten warm from the oven, but they can be covered and stored for a few days at room temperature or in the refrigerator.

Makes about 12 Financiers.

Printable recipe

Caramel Apple Cake

October 12th, 2012

This is a very simple and moist apple cake with a caramel glaze on top.  I saw the recipe on Pinterest and it appealed to my autumnal senses.  I made it even easier by using a prepared caramel sauce from William Sonoma on the top.

Holes are poked in the top to let the caramel sauce soak in.  My only criticism of the cake is that it is almost too sweet.  But it is my understanding that the original recipe came from Paula Deen, which might explain that.

We have company this weekend and I have been busy cooking.  I’m thinking this will be good with a scoop of ice cream.  We are looking forward to a weekend of riding motorcycles on The Blue Ridge Parkway to enjoy the beauty of the season.  This and a succulent beef brisket will be nice to have when we get home.  More about that beef brisket later.

CARAMEL APPLE CAKE (adapted from The Charm of Home)

2 1/2 cups sugar
3 eggs
1 1/2 cups vegetable oil
2 teaspoons vanilla
3 cups flour
1 teaspoon cinnamon
1/2 teaspoon salt
2 cups diced apples
1 cup chopped walnuts

Caramel Topping:
1 1/2 sticks butter
1 cup brown sugar
1/8 cup milk

Preheat oven to 350 degrees F.  Butter and flour a 13×9-inch pan.

Place sugar, eggs, oil and vanilla in the bowl of a stand mixer and mix until mixture is light and fluffy.  Combine flour, cinnamon and salt and slowly add to sugar mixture until well combines.  Stir in apples and walnuts.  Pour batter into baking pan.  Bake for 45 to 60 minutes.  Poke holes in warm cake and pour caramel sauce over top.

Caramel Sauce:  In a saucepan melt butter with brown sugar and milk.  Bring to a boil and cook for 2 minutes.  If you are in a hurry you can use a purchased caramel sauce. (About 1 cup).

Printable recipe

Orange and Olive Oil Cake

January 10th, 2012

I have a list of Pins on Pinterest that I would love to get through this year.  If you haven’t been to that website you really should give it a look.  The whole idea is that you can create pin boards of images that you have seen on the web and go back to your pin boards anytime that you would like.  I have pin boards for home design ideas, Holiday ideas and of course Recipes to Try.  This recipe appeared on Pinterest not too long ago and the idea of a refreshing orange studded cake (or sweet bread) really appealed to me.  The use of olive oil instead of butter sounded like a healthy alternative also.

The original recipe came from Smitten Kitchen.  Deb used blood oranges in the recipe.  The recipe that appeared on Pinterest came from Small Kitchen College started by the gals at Big Girls Small Kitchen fame.  I adapted the recipe from their recipe.  But the concept is simple and delicious.  The batter is flavored with orange zest, orange juice and orange chunks.  The fat is olive oil instead of butter.  I was lucky enough to have some leftover O Olive Oil Blood Orange oil to use from the contest I was in recently.  By the way, I did not win in case you are wondering.  The recipe calls for 2/3 cups of olive oil.  I had about 1/3 cup of the flavored oil and used 1/3 cup of regular olive oil.

The cake was moist and delicious with an appealing orange flavor.  You can serve it as is for breakfast or topped with fruit and whipped cream for dessert.  I had it mixed up and in the oven before I walked the dog this morning  What a treat is was to come home to the lovely smells emanating from my oven.

One Pin off of my list!  I would do better if I didn’t keep finding more pins to add. 

ORANGE AND OLIVE OIL CAKE

Butter for greasing pan
2 oranges
1 cup sugar
1/2 cup plain yogurt ( I used sour cream )
3 large eggs
2/3 cup extra virgin olive oil
1 3/4 cups all-purpose flour
1 1/2 teaspoon baking powder
1/4 teaspoon baking soda
1/4 teaspoon salt

Preheat oven to 350 degrees F. and grease a loaf pan.

In a large bowl, add the zest of 2 oranges, sugar, eggs, yogurt or sour cream and olive oil.  Squeeze in the juice of 1 orange.  Cut another peeled orange into 1/4 inch cubes and add to the bowl.  Mix well.  In another bowl, mix together the flour, baking powder, baking soda and salt.

Add the wet and dry ingredients together and stir well.  Pour the batter into the greased pan.  Bake for approx. 50 minutes or until a toothpick comes out clean.

Printable recipe

Labor Day on the Lake

September 7th, 2011

It was the best of times.  There is nothing like spending a long weekend with the family enjoying the end of summer on the lake.  We had cookouts, a birthday to celebrate, a wine tasting and some firsts.  Unfortunately I took very few pictures of the food but will share some of the images from the weekend.

Granddaughter Rachel has been taking swimming lessons and this was the first year that she jumped into the water from the dock.

It was Grandson Cameron’s first visit to Lake Lure.


Uncle Jeff got a chance to wakeboard.

We had a blind wine tasting of Pinot Noir wines from California.  The unanimous winner was a Hendry Vineyard Napa Valley Pinot Noir 2008.  Thank you Dave A. for always bringing a case of Hendry wines to the holiday get together.

The kids had their own blind fruit juice tasting.  The winner was Simply Lemonade.

David smoked two pork butts for our pulled pork dinner.  It was better than any barbecue restaurant in North Carolina.  He made a ketchup based sauce and a vinegar based sauce.

My friend Lyla suggested I try Trisha Yearwood’s recipe for Crockpot Macaroni and Cheese.  In the interest of keeping it real here, I have to tell you that this is not my picture.  I did not remember to take a picture.  The picture came from this site.  The adults absolutely loved the mac and cheese and it was easy to put together.  The kids liked it, but did not love it.  It has something to do with that little box of powdered cheese, if you know what I mean.

We also celebrated our DIL Kristen’s birthday.  I made a Lemon Layer Cake with Raspberry Curd.  I made the cake layers and the raspberry curd ahead of time and frosted the cake on the day that we served it.  The cake layers are split in half and the raspberry curd is spread between the layers.

The raspberry curd  filling was delicious.  The recipe came from a book called Luscious Berry Desserts by Lori Longbotham.  Here it is.

LEMON LAYER CAKE WITH RASPBERRY CURD

Cake:
2 1/2 cups cake flour
2 3/4 teaspoons baking powder
1/4 teaspoon salt
1 3/4 cups sugar
2 tablespoons lemon zest
1 1/2 sticks unsalted butter
1 cup whole milk
5 large egg whites, room temperature
1/4 teaspoon cream of tartar

Raspberry Curd:
1 stick unsalted butter
12 ounce package frozen raspberries, thawed
5 large egg yolks
3/4 cup sugar
pinch salt
2 teaspoons lemon juice

Frosting:
2 sticks unsalted butter
2 tablespoons lemon zest
3 1/2 cups sifted confectioners sugar
3 tablespoons lemon juice

Curd Directions:
Melt butter over medium heat.
Add raspberries, yolks, sugar, and salt. Mash raspberries. Cook 10 minutes, stirring frequently.
Pour through a strainer, pressing to extract as much as possible.
Cool to room temperature then stir in lemon juice. Chill.

Cake Directions:
Heat oven to 350. Prepare two 8×2 round cake pans. Whisk together flour, baking powder, and salt.
Pulse 1/4 cup of the sugar with lemon zest in food processor until finely ground.
Beat butter and zest mixture with electric mixer on medium-high speed until fluffy. Add remaining sugar and beat until smooth.
Add 1/4 cup milk and beat until just blended. Reduce speed to low and alternately add flour and milk in 3 batches. Beat only until blended, no longer.
Beat egg whites in a large bowl until foamy. Add cream of tartar and beat to stiff peaks.
Fold the egg whites into the batter carefully.
Divide batter between the two pans and bake about 35 minutes.
Cool 10 minutes in pan then remove and cool completely.

Frosting Directions:

Beat butter and zest until fluffy.
Gradually add sugar and beat until light and fluffy.
Add lemon juice and beat for one minute.

Assembly:

Cut each cake into two layers.
Spread curd in between layers, leaving about a 1/2 inch border.
Spread frosting on sides and top

Printable recipe

© Penny Klett, Lake Lure Cottage Kitchen. All rights reserved.