Crispy- Creamy Chocolate Cookies

August 20th, 2009

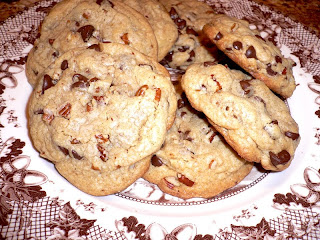
If you recall, one of my new favorite cookies was this one. But I have to tell you that this chocolate cookie is probably the best cookie I have ever tasted. When I took the first batch from the oven I tasted one and took the rest of it to David who was sawing wood for trim work on our downstairs renovation. The next thing I knew, there he was in the kitchen covered in sawdust looking for another. It is that good. As well it should be. It is another fabulous recipe from Peggy Knickerbocker in her book Simple Soirees. Are you tired of this cookbook yet? I’m not.

The original recipe came from Pierre Herme, the famous Parisian baker. Peggy Knickerbocker divides her time between San Francisco and Paris. She adapted this cookie from his recipe. The recipe as written relies on only the best ingredients, as it should. Unfortunately I did not have access to the very best chocolate, but in spite of that the cookies were still outstanding. It is probably wrong to offer such superlatives in describing the unique richness of these cookies, but they really are worthy of a staring role as dessert at a dinner party.

The cookies are easy to prepare. They are slice and bake cookies. You just assemble them ahead of time, roll them into two logs, refrigerate and slice and bake when you are ready to serve them. As an aside, I have to tell you how great the internet is. When I read the recipe in the cookbook, it called for only 1/4 cup flour. I knew this could not be correct, so I googled Peggy’s name and the name of the cookies and found a site that had discovered the mistake in the cookbook and corrected the measurement to 1 and 1/4 cups. I would love some input from any of you who make them. The chocolate I used is in parenthesis. If you have access to the chocolate called for, I would love to hear from you about the results. These cookies are worthy of respect.

CRISPY-CREAMY CHOCOLATE COOKIES

1/3 cup excellent quality processed, sweetened cocoa powder, such as E. Guittard or Scharffen Berger. ( I used Special Dark Hershey’s Cocoa; I know, I know; not good)
1/2 tsp baking soda
1 1/4 cup all purpose flour
11 Tbls. (1 stick plus 3 tablespoons) unsalted butter
2/3 cup dark brown sugar
1/4 cup granulated sugar
1/4 tsp sea salt or fleur de sel
1 tsp vanilla extract
5 ounces excellent quality bittersweet chocolate such as E. Guittard, roughly chopped ( I used Ghiradelli bittersweet chocolate, a 4 ounce bar.) I refrigerated it before chopping.

Sift together the cocoa powder, baking soda, and flour. In a large mixing bowl, using a mixer, cream the butter until smooth, add the brown sugar and granulated sugar and blend again. Add the salt and vanilla and blend for about 1 1/2 minutes. Add the flour mixture to the butter mixture and mix on the lowest speed until the ingredients are incorporated. The dough will be crumbly. Stir in the chopped chocolate.

Turn the dough onto a work surface. Press the mixture together with your hands, forming a ball Cut the ball in half and work each half into a log about 1 1/2 inches in diameter. Wrap each log in plastic and refrigerate for at least 1 hour.

Preheat oven to 325 degrees. Line 2 baking sheets with parchment.

Slice the logs into 1/2 inch thick rounds. Place the rounds on the baking sheets, 1 inch apart. If the cookies break apart, press them back together.

Bake one sheet at a time for 12 minutes. The cookies will not be firm nor appear to be done. Remove them from the oven and let them cool on the sheet on a wire rack until they are barely warm. Store the cookies in an airtight container. The recipe says it makes 4 dozen, but 2 is more like it.

Auntie Cookies and the Importance of Personal History

August 4th, 2009

I have just returned from a trip to my hometown in Michigan. I apologize for the lack of posts lately, but travel and computer problems have left me frustrated with my ability to blog and comment on all of my favorite sites. What I am not frustrated about is the amazing visit I had to Michigan. There is no better place to be in the summer than Michigan. The corn fields are producing the sweetest corn I have ever tasted. The farms are cultivating apples, cherries and blueberries. The fertile dark soil makes home gardens proliferate with pole beans, tomatoes, squash, cucumbers, potatoes, and onions. My brother’s garden makes me so envious. I will be showing you pictures and telling you more about it in a later post. But for now I want to tell you about growing up in this beautiful place.

Our childhoods shape us in so many significant ways. I sometimes wonder why it is that things that happen to us in our early years carry such magic and nostalgia. It never seems to fade from our memories. The memories are rich with childhood innocence, but even as young as we were, there is a maturity in our thoughts that I don’t think our parents appreciated. I try to keep that in mind with my granddaughter. She is much more aware than I give her credit for. And she is creating her past and personal history on a daily basis.

I made a friend in Kindergarten. Her name was Lyla. We shared a locker. The school we attended held grades Kindergarten through 12th grade and it had marble halls, wide marble staircases and three floors. Lyla lived a few blocks away from me in a beautiful house with many rooms to explore and I remember spending nights with her and her sister Debbe. We shared so many experiences. We learned to read together in the first grade. She has just retired from a career as an English teacher. We ran away from the school bully who threatened to “beat her up” after school. I was supposed to have her back, but when confronted with Cora Mae, told her I would run and get her Mother. I think I just wanted to run. She has forgiven me for abandoning her. It actually took a little nudging to my memory to remember this incident. You see we just reconnected on Facebook. I haven’t seen her or talked to her since we were thirteen. We are renewing and reconciling our relationship. Sometimes friends drift apart but it is so comforting to come together again and complete the circle of friendship.

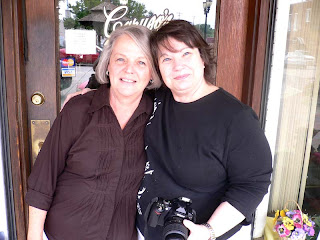
Lyla and I met again last Saturday at Caruso’s. Every town has a place where everyone hangs out and we had one of the best. Caruso’s Candy Kitchen is an old fashioned Soda Shop that makes the best Toasted Tuna that I have ever tasted. They have been making this sandwich since I was a young teenager and probably made it when my Mother was a young teenager. They also make their own candy and the old candy case has been in place since the store opened years ago. Nothing has changed. All of us from Dowagiac return to our roots and memories at Caruso’s. Lyla and I had so much to talk about that we could have stayed all afternoon. Our friendship has been renewed. She now looks like her Mother and I look like mine.

Lyla brought me some gifts. Among them was a tin of Auntie Cookies. The story about these cookies is another personal history. Parthenia Hutton (1861-1958) was the maiden aunt who mothered three generations of Lewis offspring ( Dood was Lyla’s Grandmother and Parthenia’s niece). Aunt Senie was a master cook. She was especially adept at making sugar cookies which she did every Tuesday for most of her adult life. These cookies are as good today as they were over a century ago.

AUNTIE COOKIES

In Dood’s own words.

Turn on oven to 400 degrees before you begin.

(If you can read, you can bake.)

1 C brown sugar
1/2 C white sugar
1 Cup shortening – all margarine or 1/2 margarine and 1/2 Crisco
1 t lemon extract
Mix the above ingredients. ( Lyla uses her Kitchenaid) Or hand mixer

Then add 2 eggs, one at a time. Beat with mixer after each addition.

Next add 1/2 C buttermilk with 3/4 t soda dissolved in it. ( I think dissolving the soda is important.)

Measure 2 C flour and 1 t salt. Then sift together into wet ingredients.

Drop by teaspoonfuls onto parchment covered cooke sheet. Bake in 400 degree oven for 8-10 minutes. Remove from oven and sprinkle sugar on top of cookies. Enjoy.

This is a picture of Lyla and me in front of Caruso’s. So much history, not to be forgotten, in our friendship.

Printable recipe

Peach & Blueberry Crumbles

July 23rd, 2009


The second Barefoot Blogger recipe for the month of July is Peach & Blueberry Crumbles chosen by Aggie of Aggie’s Kitchen. What a perfect recipe this is. Peaches and blueberries are plentiful in the markets right now and where Aggie is in Florida they are available locally.

The original Ina Garten recipe calls for the crumbles to be prepared in indivdual ramekins, but I chose to make one larger casserole. I halved the fruit ingredients but made the full recipe for the topping. As it turned out I did not need all of the topping, but halving it would not have been enough. I put the small amount that was left over in a baggie and put it in the freezer for future crumbles. And there will be future crumbles. This was the most delicious crumble I have ever made. When I served it last night I realized that I did not have any ice cream to go with it. After one bite my husband said “This is so good it doesn’t need ice cream”. With the calories we saved by not eating ice cream I think we deserved a second piece. You will love this! Thanks Aggie.

PEACH & BLUEBERRY CRUMBLES
For the fruit

2 lbs firm, ripe peaches (6-8 peaches)
2 tsp grated lemon zest
2 tbsp freshly squeezed lemon juice
1/2 cup granulated sugar
1/4 cup all-purpose flour
1 cup fresh blueberries (1/2 pint)

For the Crumble

1 cup all-purpose flour
1/2 cup granulated sugar
1/4 cup light brown sugar, lightly packed
1/2 tsp kosher salt
1/4 tsp ground cinnamon
1/4 lb (1 stick) cold unsalted butter, diced

Preheat the oven to 350 degrees.

Immerse the peaches in boiling water for 30 seconds to 1 minute, until their skins peel off easily. Place them immediately in cold water. Peel the peaches, slice them into thick wedges, and place them in a large bowl. Add the lemon zest, lemon juice, granulated sugar, and flour. Toss well. Gently mix in the blueberries. Allow the mixture to sit for 5 minutes. Spoon the mixture into ramekins or custard cups.

For the topping, combine the flour, granulated sugar, brown sugar, salt, cinnamon, and the butter in the bowl of an electric mixer fitted with a paddle attachment. Mix on low speed until the butter is the size of peas. Rub the mixture with your fingertips until it’s in big crumbles, then sprinkle evenly over the fruit. Place the ramekins on a sheet pan lined with parchment paper and bake for 40 to 45 minutes, until the tops are browned and crisp and the juices are bubbly. Serve warm or at room temperature. If you want to make these early, store the unbaked crumbles in the refrigerator and bake before dinner. Serves 5 to 6.

Brown Sugar Almond Bars

July 7th, 2009

There has been little creative cooking lately. After a cooking marathon on the 4th I have become a slacker. But I have some interesting recipes in the works, so stay tuned. In the meantime here is an easy old time favorite that came from a high school friend. I have stayed in touch with a group of girls that shared the angst- ridden teens with me and several years ago at a reunion of ten of us, we decided to write a cookbook. My friend Norma, who was a caterer in Dallas at the time, knew someone who put together community cookbooks. I gathered the recipes from all of the girls and we printed our very own cookbook. We sold the book to our friends and family. It is so nice to flip through the cookbook and pick a recipe and think about the friend who submitted it. These easy almond bars came from Maryann who now lives in New Mexico. Thanks Maryann!

BROWN SUGAR ALMOND BARS
1/2 cup butter, softened
1/2 cup confectioner’s sugar, sifted
1 cup flour
1/4 tsp salt
3 Tbls butter
1/2 cup brown sugar
1 Tbls water
3/4 tsp lemon juice
3/4 cup slices almonds
3/4 tsp vanilla
Cream 1/2 cup butter with confectioner’s sugar. Add flour and salt and mix well. Pat into ungreased 8″x 8″ pan. Bake at 350 degrees for 12 to 15 minutes. Melt remaining butter. Add brown sugar, water and lemon juice; bring mixture to a boil, stirring constantly. Remove from heat; stir in almonds and vanilla. Spread mixture over warm crust. Bake 15 to 20 minutes more. Cut into bars while warm. Cool before removing bars from pan.

My New Favorite Chocolate Chip Cookies

June 14th, 2009

I hate to admit it, but I have never been satisfied with my chocolate chip cookies. Every time I make them they fall flat and run all over the baking sheet. They are crisp though, which is fine with me but my husband likes his cookies a little chewier. I am so excited to say that I have finally found the perfect recipe and it is called fittingly, Perfect Chocolate Chip Cookies just like the cookies shipped to your door.
As you are probably aware, the Cook’s Illustrated magazine spends an inordinate amount of time researching and testing recipes. They recently took on chocolate chip cookies and I am so glad they did. The resultant cookie is both crisp and chewy with a pleasant toffee flavor and a nice fat top. I almost jumped up and down when I took the first batch from the oven. Instead of creaming softened butter with the sugars, part of the butter is melted and browned in a pan to release that wonderful toffee flavor and dark brown sugar is used to heighten the rich flavor. Also the sugar is allowed to rest for a while in the butter mixture to be sure it is all dissolved. Instead of the tablespoon size cookie scoop normally called for, these cookies call for 3 tablespoons rolled into a ball which gives the finished cookie it’s nice rounded top. The recipe makes only 16 cookies, but the results are worth it. David returns from his fishing trip tonight. I have a feeling he will love these cookies.
Just a quick disclaimer before I give you the recipe. To the best of my knowledge the recipe is just as it appears in the magazine. Cook’s Illustrated has a reputation for becoming upset with bloggers who change their recipes.
PERFECT CHOCOLATE CHIP COOKIES
Makes 16 cookies
Note: Avoid using a nonstick skillet to brown the butter; the dark color of the nonstick coating makes it difficult to gauge when the butter is browned. Use fresh. moist brown sugar instead of hardened brown sugar, which will make the cookies dry. This recipe works with light brown sugar, but the cookies will be less full-flavored.

1 3/4 cups (8 3/4 ounces) unbleached all-purpose flour

1/2 tsp baking soda
14 tablespoons (1 3/4 sticks) unsalted butter
1/2 cup (3 1/2 ounces) granulated sugar
3/4 cup (5 1/4 ounces) packed dark brown sugar
1 teaspoon table salt
2 teaspoons vanilla extract
1 large egg
1 large egg yolk
1 1/4 cup semisweet chocolate chips or chunks
3/4 cup chopped pecans or walnuts, toasted (optional)
1. Adjust oven rack to middle position and heat oven to 375 degrees. Line 2 large ( 18-by-12 inch) baking sheets with parchment paper. Whisk flour and baking soda together in medium b0wl; set aside.
2. Heat 10 tablespoons butter in 10-inch skillet over medium-high heat until melted, about 2 minutes. Continue cooking, swirling pan constantly until butter is dark golden brown and has a nutty aroma, 1 to 3 minutes. Remove skillet from heat and, using heatproof spatula, transfer browned butter to large heatproof bowl. Stir remaining 4 tablespoons butter into hot butter until completely melted.
3. Add both sugars, salt, and vanilla to bowl with butter and whisk until fully incorporated. Add egg and yolk and whisk until mixture is smooth with no sugar lumps remaining, about 30 seconds. Let mixture stand 3 minutes, then whisk for 30 seconds. Repeat process of resting and whisking 2 more times until mixture is thick, smooth, and shiny. Using rubber spatula or wooden spoon, stir in flour mixture until just combined, about 1 minute. Stir in chocolate chips and nuts (if using), giving dough final stir to ensure no flour pockets remain.
4. Divide dough into 16 portions, each about 3 tablespoons (or use #24 cookie scoop). Arrange 2 inches apart on prepared baking sheets, 8 dough balls per sheet (Smaller baking sheets can be used, but will require 3 batches.)
5. Bake cookies 1 tray at a time until cookies are golden brown and still puffy, and edges have begun to set but centers are still soft, 10 to 14 minutes, rotating baking sheet halfway through baking. Transfer baking sheet to wire rack; cool cookies completely before serving.


Printable Recipe

© Penny Klett, Lake Lure Cottage Kitchen. All rights reserved.