Peach & Blueberry Crumbles

July 23rd, 2009


The second Barefoot Blogger recipe for the month of July is Peach & Blueberry Crumbles chosen by Aggie of Aggie’s Kitchen. What a perfect recipe this is. Peaches and blueberries are plentiful in the markets right now and where Aggie is in Florida they are available locally.

The original Ina Garten recipe calls for the crumbles to be prepared in indivdual ramekins, but I chose to make one larger casserole. I halved the fruit ingredients but made the full recipe for the topping. As it turned out I did not need all of the topping, but halving it would not have been enough. I put the small amount that was left over in a baggie and put it in the freezer for future crumbles. And there will be future crumbles. This was the most delicious crumble I have ever made. When I served it last night I realized that I did not have any ice cream to go with it. After one bite my husband said “This is so good it doesn’t need ice cream”. With the calories we saved by not eating ice cream I think we deserved a second piece. You will love this! Thanks Aggie.

PEACH & BLUEBERRY CRUMBLES
For the fruit

2 lbs firm, ripe peaches (6-8 peaches)
2 tsp grated lemon zest
2 tbsp freshly squeezed lemon juice
1/2 cup granulated sugar
1/4 cup all-purpose flour
1 cup fresh blueberries (1/2 pint)

For the Crumble

1 cup all-purpose flour
1/2 cup granulated sugar
1/4 cup light brown sugar, lightly packed
1/2 tsp kosher salt
1/4 tsp ground cinnamon
1/4 lb (1 stick) cold unsalted butter, diced

Preheat the oven to 350 degrees.

Immerse the peaches in boiling water for 30 seconds to 1 minute, until their skins peel off easily. Place them immediately in cold water. Peel the peaches, slice them into thick wedges, and place them in a large bowl. Add the lemon zest, lemon juice, granulated sugar, and flour. Toss well. Gently mix in the blueberries. Allow the mixture to sit for 5 minutes. Spoon the mixture into ramekins or custard cups.

For the topping, combine the flour, granulated sugar, brown sugar, salt, cinnamon, and the butter in the bowl of an electric mixer fitted with a paddle attachment. Mix on low speed until the butter is the size of peas. Rub the mixture with your fingertips until it’s in big crumbles, then sprinkle evenly over the fruit. Place the ramekins on a sheet pan lined with parchment paper and bake for 40 to 45 minutes, until the tops are browned and crisp and the juices are bubbly. Serve warm or at room temperature. If you want to make these early, store the unbaked crumbles in the refrigerator and bake before dinner. Serves 5 to 6.

Brown Sugar Almond Bars

July 7th, 2009

There has been little creative cooking lately. After a cooking marathon on the 4th I have become a slacker. But I have some interesting recipes in the works, so stay tuned. In the meantime here is an easy old time favorite that came from a high school friend. I have stayed in touch with a group of girls that shared the angst- ridden teens with me and several years ago at a reunion of ten of us, we decided to write a cookbook. My friend Norma, who was a caterer in Dallas at the time, knew someone who put together community cookbooks. I gathered the recipes from all of the girls and we printed our very own cookbook. We sold the book to our friends and family. It is so nice to flip through the cookbook and pick a recipe and think about the friend who submitted it. These easy almond bars came from Maryann who now lives in New Mexico. Thanks Maryann!

BROWN SUGAR ALMOND BARS
1/2 cup butter, softened
1/2 cup confectioner’s sugar, sifted
1 cup flour
1/4 tsp salt
3 Tbls butter
1/2 cup brown sugar
1 Tbls water
3/4 tsp lemon juice
3/4 cup slices almonds
3/4 tsp vanilla
Cream 1/2 cup butter with confectioner’s sugar. Add flour and salt and mix well. Pat into ungreased 8″x 8″ pan. Bake at 350 degrees for 12 to 15 minutes. Melt remaining butter. Add brown sugar, water and lemon juice; bring mixture to a boil, stirring constantly. Remove from heat; stir in almonds and vanilla. Spread mixture over warm crust. Bake 15 to 20 minutes more. Cut into bars while warm. Cool before removing bars from pan.

My New Favorite Chocolate Chip Cookies

June 14th, 2009

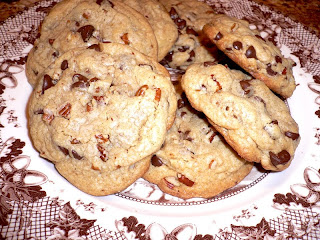
I hate to admit it, but I have never been satisfied with my chocolate chip cookies. Every time I make them they fall flat and run all over the baking sheet. They are crisp though, which is fine with me but my husband likes his cookies a little chewier. I am so excited to say that I have finally found the perfect recipe and it is called fittingly, Perfect Chocolate Chip Cookies just like the cookies shipped to your door.
As you are probably aware, the Cook’s Illustrated magazine spends an inordinate amount of time researching and testing recipes. They recently took on chocolate chip cookies and I am so glad they did. The resultant cookie is both crisp and chewy with a pleasant toffee flavor and a nice fat top. I almost jumped up and down when I took the first batch from the oven. Instead of creaming softened butter with the sugars, part of the butter is melted and browned in a pan to release that wonderful toffee flavor and dark brown sugar is used to heighten the rich flavor. Also the sugar is allowed to rest for a while in the butter mixture to be sure it is all dissolved. Instead of the tablespoon size cookie scoop normally called for, these cookies call for 3 tablespoons rolled into a ball which gives the finished cookie it’s nice rounded top. The recipe makes only 16 cookies, but the results are worth it. David returns from his fishing trip tonight. I have a feeling he will love these cookies.
Just a quick disclaimer before I give you the recipe. To the best of my knowledge the recipe is just as it appears in the magazine. Cook’s Illustrated has a reputation for becoming upset with bloggers who change their recipes.
PERFECT CHOCOLATE CHIP COOKIES
Makes 16 cookies
Note: Avoid using a nonstick skillet to brown the butter; the dark color of the nonstick coating makes it difficult to gauge when the butter is browned. Use fresh. moist brown sugar instead of hardened brown sugar, which will make the cookies dry. This recipe works with light brown sugar, but the cookies will be less full-flavored.

1 3/4 cups (8 3/4 ounces) unbleached all-purpose flour

1/2 tsp baking soda
14 tablespoons (1 3/4 sticks) unsalted butter
1/2 cup (3 1/2 ounces) granulated sugar
3/4 cup (5 1/4 ounces) packed dark brown sugar
1 teaspoon table salt
2 teaspoons vanilla extract
1 large egg
1 large egg yolk
1 1/4 cup semisweet chocolate chips or chunks
3/4 cup chopped pecans or walnuts, toasted (optional)
1. Adjust oven rack to middle position and heat oven to 375 degrees. Line 2 large ( 18-by-12 inch) baking sheets with parchment paper. Whisk flour and baking soda together in medium b0wl; set aside.
2. Heat 10 tablespoons butter in 10-inch skillet over medium-high heat until melted, about 2 minutes. Continue cooking, swirling pan constantly until butter is dark golden brown and has a nutty aroma, 1 to 3 minutes. Remove skillet from heat and, using heatproof spatula, transfer browned butter to large heatproof bowl. Stir remaining 4 tablespoons butter into hot butter until completely melted.
3. Add both sugars, salt, and vanilla to bowl with butter and whisk until fully incorporated. Add egg and yolk and whisk until mixture is smooth with no sugar lumps remaining, about 30 seconds. Let mixture stand 3 minutes, then whisk for 30 seconds. Repeat process of resting and whisking 2 more times until mixture is thick, smooth, and shiny. Using rubber spatula or wooden spoon, stir in flour mixture until just combined, about 1 minute. Stir in chocolate chips and nuts (if using), giving dough final stir to ensure no flour pockets remain.
4. Divide dough into 16 portions, each about 3 tablespoons (or use #24 cookie scoop). Arrange 2 inches apart on prepared baking sheets, 8 dough balls per sheet (Smaller baking sheets can be used, but will require 3 batches.)
5. Bake cookies 1 tray at a time until cookies are golden brown and still puffy, and edges have begun to set but centers are still soft, 10 to 14 minutes, rotating baking sheet halfway through baking. Transfer baking sheet to wire rack; cool cookies completely before serving.


Printable Recipe

Chocolate, Pear, & Almond Tart

June 6th, 2009

Kate of Warm Olives and Cool Cocktails is having a Great Cookbook Giveaway. She has too many cookbooks and is giving them away to fellow food bloggers. The only stipulation she has is that the recipient needs to blog about a recipe from the book they win and mention her blog when they do, so that others will be aware of this opportunity. I was lucky enough to win her first giveaway. The book that I won was Entertain by Ed Baines. Ed Baines is a hotty. He is the chef and co-owner of Randall & Aubin champagne and oyster bar in London’s Soho. He appears on his own TV show, Ed Baines Entertains and for a time he was the official Armani chef and a model on the side. What’s not to like about the guy? He has a passion for food and grew up in a household where fresh local ingredients were the norm. My only problem was trying to figure out which of his wonderful recipes to try.


The recipe I finally chose was Chocolate, Pear & Almond Tart. For those of you who have followed my blog, you probably know that I am partial to pastries and tarts. I would be in my element in a French Patisserie. What I loved about this tart was the first burst of chocolate and orange zest in my mouth when I tasted it. To me chocolate and orange were made for each other. The almonds and pears were more subtle but balanced well with the stronger flavors. The one thing I had a problem with was the pastry. It did not brown as much as I would have liked. I think this problem could be solved by baking the tart at a higher temperature. Even though it did not brown well the pastry was excellent due to the addition of powdered sugar. Ed Baines is an excellent chef and I am pleased to own his cookbook. Thank you Kate for the gift and for inscribing a message to me. Now, all of you need to go over to her blog to take advantage of the cookbook giveaway.

CHOCOLATE, PEAR, & ALMOND TART

For the Pastry:
2 cups all purpose flour
3/4 cup confectioners’ sugar
a pinch of salt
1 stick of unsalted butter, plus more for greasing
1 egg
1 Tbls orange zest

Sift the flour, confectioners’ sugar, and salt into a large mixing bowl and mix together. Add the softened butter and using your fingertips, rub it into the flour until you have a breadcrumb consistency. In a separate bowl, whisk the egg and orange rind together with 1 tablespoon of water. Add this to the flour mixture and stir, then work the mixture together until you have a dough. Wrap the dough in plastic wrap and place in the refrigerator to rest for at least 30 minutes.

Tart Filling:
1 stick of cubed butter, softened
3 -4 fresh pears (or canned pear halves, drained) I used canned
2 ounces ground almonds
2 ounces slivered almonds
3/4 cup all purpose flour
1/2 cup sugar
4 large eggs
1/2 tsp vanilla
zest of one large orange
9 ounces dark chocolate, shredded ( I used mini chocolate chips)
1 Tbls apricot jam

Preheat the oven to 325 degrees ( I say 350 degrees). Butter a 10 inch tart pan. Peel and core the pears if fresh, then cut them into halves lenghwise. Roll out the pastry and use to line the tart pan. Prick the base of the tart with a fork several times ( this stops the pastry rising through the filling ).

In a large mixing bowl, mix the ground almonds, flour, sugar, and cubes of softened butter with your fingertips, until you have a crumble. Now add the eggs and mix well, again using your fingertips, until you have a paste. Add the vanilla extract, orange rind, shredded chocolate, and slivered almonds, and fold this mixture together.

Place the pear halves over the base of the tart shell and pour over the mixture. Bake in the oven for about 40 minutes.

While this is cooking, put the apricot jam in a saucepan with 2 tablespoons of water and heat gently to form a light syrup.

To test if the tart is properly cooked through, push in a small knife tip and remove; if nothing is sticking to it, the tart is done. Remove from the oven and lightly brush wih the apricot glaze.

This tart is best served hot, with either ice cream or custard flavored with a dash of Amaretto.

Printable Recipe

Sunday Brunch Part 5 – Charlotte Malakoff and Outrageous Brownies

May 28th, 2009

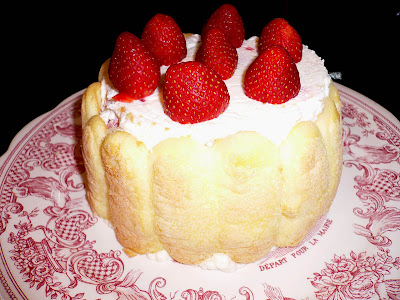
There are two dessert offerings for this brunch. The first dessert takes advantage of the fresh strawberries that are currently coming out of South Carolina. It also takes me on a trip down memory lane because Charlotte Malakoff was one the first gourmet desserts that I prepared in the 70’s. I bought a special tin charlotte mold and loved the contours of it and the heart shaped handles. Recently while unpacking kitchen boxes after our permanent move to Lake Lure, I unearthed this treasure and decided that charlottes of all description would be in our future.


A Charlotte Malakoff is made with Ladyfingers surrounding a filling of whipped butter, sugar, cream and strawberries. Sometimes the lady fingers are soaked in Kirsch. I chose not to soak them at all in this rendition. Another element in the flavoring is almonds; in this case ground almonds. Charlottes can be flavored with chocolate, pumpkin or peaches or any flavoring that appeals to you. If you do not have a charlotte mold you can use a souffle dish.

CHARLOTTE MALAKOFF

Enough Lady fingers to line the sides of the mold
1/2 cup unsalted butter, softened
1/2 cup sugar
2 ounce package of sliced almonds, ground
1/2 tsp almond extract
2 cups heavy cream, whipped
1 pint of strawberries
Line the bottom of a charlotte mold or souffle dish with waxed paper. Arrange lady fingers in a circle around sides of mold.
Cream the butter and sugar until light and fluffy. Beat in the ground almonds and almond extract. Gently fold the mixture into whipped cream.
Save 6 nice strawberries for the top. Cut the rest into fourths and fold into whipped cream mixture. Place the mixture into ther mold. Chill for at least 2 hours.
To serve, unmold the charlotte onto a serving dish and remove the wax paper. Decorate with the whole strawberries.

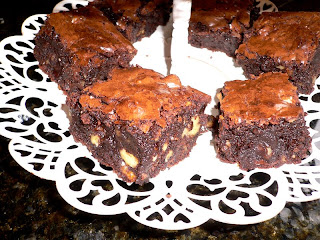
Since this is Barefoot Blogger Thursday, I decided to include Ina’s Outrageous Brownies as part of my brunch menu. Thank you Eva of I’m Boring for choosing this decadent dessert. I have actually made these brownies before so I knew that everyone would be in for a treat with this dish. They are rich, but very easy to prepare and there is nothing better than a little chocolate to round out a satisfying meal. Thank you for following me on the never ending (or so it seemed) brunch party. It was fun for me to put together and I enjoyed having all of you come along.

OUTRAGEOUS BROWNIES ( I halved this recipe )
1 pound unsalted butter
1 pound plus 12 ounces semisweet chocolate chips
6 ounces unsweetened chocolate
6 extra large eggs
3 Tbls instant coffee granules
2 Tbls pure vanilla extract
2 1/4 cups sugar
1 1/4 cups all purpose flour
1 Tbls baking powder
1 tsp salt
3 cups chopped walnuts

Preheat the oven to 350 degrees. Butter and flour a 12 x 18 x 1 inch baking sheet.
Melt together the butter, 1 pound of chocolate chips, and the unsweetened chocolate in a medium bowl over simmering water. Allow to cool slightly. In a large bowl, stir (do not beat) together the eggs, coffee granules, vanilla, and sugar. Stir the warm chocolate mixture into the egg mixture and allow to cool to room temperature.
In a medium bowl, sift together 1 cup of flour, the baking powder, and salt. Add to the cooled chocolate mixture. Toss the walnuts and 12 ounces of chocolate chips in a medium bowl with 1/4 cup flour, then add them to the chocolate batter. Pour into the baking sheet.
Bake for 20 minutes, then rap the baking sheet against the oven shelf to force the air to escape from between the pan and the brownie dough. Bake for about 15 minutes, until a toothpick comes out clean. Do not overbake! Allow to cool thoroughly, refrigerate, and cut into 20 large squares.

© Penny Klett, Lake Lure Cottage Kitchen. All rights reserved.