Conch Chowder and a Beachwarming Party

February 28th, 2010


We have just returned from a quick vacation in Key West. But one of my blogging buddies, Dave of My Year on the Grill, along with his wife Jackie, are having an extended six month vacation in the Virgin Islands. Jackie works for The Government and she has pulled this unfortunate duty, so Dave being a dutiful husband has moved his grill from snowy Kansas and has set up shop in paradise.


Dave is also a weekly contributer to another blog, Our Krazy Kitchen and Min and the girls wanted to throw a beachwarming party for Dave and Jackie. We were all invited to bring something to the party and my contribution is this wonderful Conch Chowder. Surely Dave can get conchs in the Virgin Islands so I hope he will try this recipe. Enjoy your virtual party Dave!
Conchs are readily available in Key West and they are served in chowders, salads, gumbos, and fritters. They are a member of the sea snail family and are second in popularity only to the more sophisticated escargot. We encountered them in almost every restaurant we went to in Key West and our trip was way too short to sample all of the possibilities. The idea of taking this brief trip to the Keys was an effort to find someplace warm to thaw our winter weary bones. Unfortunately it was even cold in the Keys. We wore our jackets every day. We stayed at the Hollinsed House which is composed of the Main House and a Carriage House containing several studio apartments.


The above picture is the carriage house. Our apartment is located in the lower rooms with the double patio doors.


This is the pool area right outside of our door. Even though the pool was heated, it was too cold to take a dip.

The grounds were lush with vegetation and I did manage to find a ray of sun to sit by the pool in the above lounge chairs.
The Hollinsed House is located in the historic section of Key West and just blocks from the famous Duval Street and Mallory Square where sunset is celebrated each evening.

Crowds of people are drawn to the square next to the sea by street perfomers like this unicyclist, juggling fellow.

As the crowd watched, a four-masted schooner passed by in the harbor.


Cruise ships anchor here and this one almost blocked the nightly spectacle of the sunset.
No trip to Key West would be complete without a visit to The Hemingway House. Ernest Hemingway settled in Key West in the late 1920’s. He was drawn to the area by the abundant fishing possibilties.


The house reflects a Spanish Colonial style. The walls were constructed from coral rocks found in the area. Ceiling to floor windows were used as doors to access the patio and upper porches.

The first room I headed to was the kitchen. It is small but bright. The appliances and counters were raised to accomodate Hemingway’s tall frame.


A picture of Hemingway in the dining room shows him as he appeared when he and his wife Pauline bought the house. He was a young thiry year old.


Hemingway loved cats and there are still forty or more cats roaming the grounds descended from the original six-toed cat. This cat has found a comfortable spot on the buffet in the dining room.


Here are two more cats resting comfortably in Hemingway’s king size bed. The headboard is an old Spanish gate.


This is a view of one of the upper porches with it’s exterior shutters.


Hemingway’s office was located in a carriage building behind the main house. He wrote “To Have and Have Not” and “For Whom the Bell Tolls” in this room.

Cats are not the only creatures to have freedom to wander in Key West. Chickens and roosters are on every street corner; talk about free range chickens!


One of Ernest Hemingway’s favorite hangouts was Sloppy Joe’s Bar. This is not the original location, but it has become the place that everyone associates with Hemingway.


We could not go without sampling the original sloppy joe. It was delicious. I will see if I can get the recipe. But in the meantime, here is a recipe for Conch Chowder for Dave and any of you who want to participate in his Beachwarming Party. Enjoy your stay in The Virgin Islands Dave!
CONCH CHOWDER
1/4 cup diced bacon
1 garlic clove
1/2 thyme sprig
2 celery stalks, sliced finely
1/4 cup tomato paste
salt and pepper to taste
2 finely chopped onions
1 teaspoon paprika
2 medium green pepper, diced
2 potatoes, diced
1 pound conch meat
1 28 ounce can of diced tomatoes
1 cup water to thin broth
In a Dutch oven, fry bacon until golden brown. Drain. Add peppers, celery, onions, thyme, and garlic. Cook until soft. Add tomatoes, tomato paste, water, conch, and potatoes. Bring to a boil. Add enough more water to cover mixture. Simmer for 25 minutes. Return bacon to pot. Make sure there is always sufficient water in pot. Serves 4 -6.


We had the conch chowder with a plate of conch fritters.

Printable recipe

Spicy Tangerine Beef and a Snowy Day

February 2nd, 2010


What fun it was to be in North Carolina for the snow storm and to get to spend time with my son, daughter-in-law and granddaughter. Kristen was scheduled to be in Atlanta for an event honoring her business, but she opted to miss it for fear that she would not be able to get home on Sunday. Michael kept a fire burning all day Saturday and we had the neighbors over for S’mores Saturday night. Rachel got bundled up Saturday morning to play in the snow.

She is waiting for her Mimi and Mommy to suit up and get outside.

She said the snow tasted like sugar. Unfortunatly it was not a packing snow, so we could not make a snowman.

Kristen made a yummy pasta dish for dinner which she said she will blog about sometime soon. It was orecchietti pasta in a creamy tomato sauce with Trader Joe’s chicken sausage with sundried tomatoes. She added a little wine and balsamic vinegar to it and it was a very complex satisfying meal. I am so lucky to have a daughter-in-law who loves to cook as much as I do.
The planes were flying on Monday so I returned to Florida. It is a culture shock of sorts to get on a plane in cold blustery weather and get off in balmy weather. Believe me, I am not complaining. Dinner last night was this spicy tangerine beef from the Weight Watchers in 20 Minutes cookbook. It was wonderful over brown rice. It is so colorful. I love the addition of the tangerines to this. The zest was added too so it had a very fresh taste to it.
SPICY TANGERINE BEEF
2 Tangerines*
2 teaspoons cornstarch
4 tablespoons water, divided
3/4 pound boneless sirloin steak, trimmed and thinly sliced**
3 cups small broccoli florets
3 scallions, cut into 2-inch lengths
1 small red bell pepper, cut into strips
2 garlic cloves, minced
3 tablespoons reduced sodium soy sauce
1/4 teaspoon crushed red pepper
Grate the zest from the tangerines; set aside. Peel the tangerines and separate into sections; reserve the sections. Stir together the cornstarch and 2 tablespoons of the water in a cup until smooth; set aside.
Spray a nonstick wok or large deep nonstick skillet with nonstick spray (I just used a little olive oil) and set over medium-high heat. When a drop of water sizzles in it, add half of the beef and stir-fry until browned, about 3 minutes, using a slotted spoon to transfer the beef to a bowl. Repeat with the remaining beef.
Add the broccoli and the remaining 2 tablespoons water to the wok; cook, covered about 2 minutes. Increase the heat to high. Add the scallions, bell pepper, garlic, tangerine zest, soy sauce, and crushed red pepper; stir-fry about 1 minute. Stir the cornstarch mixture and add to the wok; stir-fry until the sauce thickens and bubbles, about 1 minute. Return the beef to the wok, along with the tangerine; stir-fry until heated through, about 1 minute longer.
* I cut the tops off of each tangerine section to make it easier to remove the seeds.
** I used Laura’s Lean Beef available at Target superstores. It is grass fed beef and does not use any antibiotics.
Serves 4. 4 Points

An Autumn Dinner Menu

October 10th, 2009

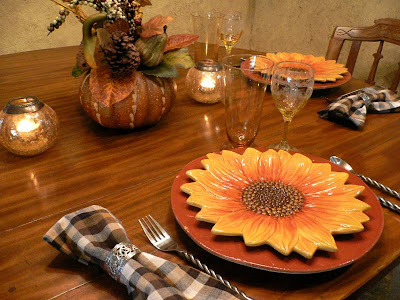
This menu was inspired by a shopping trip to add some autumnal accents to the house. I found the sunflower plates at Marshalls for a very good price and they pair well with my pumpkin Vietri dinner plates. Vietri dinnerware is usually expensive, but I was fortunate to live close to their warehouse in Hillsborough, NC. Twice a year they have a huge sale and I was able to get great discounts on this lovely Italian dinnerware. I would use the sunflower plates to serve the salad course of Baby Greens with Pears, Roasted Walnuts and Blue Cheese. This Epicurious recipe goes well with the rest of the meal that I prepared.

Pork is such a Fall kind of entree. I would have to say that if I could eat only one kind of meat it would be pork; pork chops, pork tenderloin, pork butt, or pork loin. Boneless Pork Sirloin roasts were on sale the other day. You’ve seen those roasts with the string netting around them. They are packaged like this because there are two pieces of meat that comprise the roast. I like the sirloin cut because it has both the white meat of the loin and and the darker moister meat of the hip or back area. The best way I have found to cook this cut is to brown it well on all sides in a deep roasting pan. Add seasonings and fresh rosemary and sage, add liquid such as white wine, apple cider or water and roast it uncovered in a 375 degree oven for approximately 1 and 1/2 hours.

After the roast has been in the oven for one hour, remove the netting and separate the two pieces of meat. Add more liquid to the pan if needed and baste the meat. Use a meat thermometer to check for doneness after the first hour. For the complete recipe go here.

With the roast I served Roasted Butternut Squash, Potatoes and Red Onions. If you have limited oven space you could do these ahead of time and rewarm them in the oven just before serving.

I tried to keep the vegetables a uniform size. With a drizzle of olive oil and a sprinkling of salt, pepper and cumin they roasted to a golden brown.


Since I was in a roasting kind of mood, I decided to also make Roasted Chunky Applesauce. I used Granny Smith apples for this. I coated the apple slices with softened butter, sprinkled with brown sugar, sugar and cinnamon and cooked them until they were soft and beginning to fall apart.

I would suggest that you peel the apples. The applesauce had a good flavor, but the skins were tough. Again if you have limited oven space you can do this ahead of time.

This was a fragrant and easy meal. I started cooking at 4:00 and was finished by 6:00. In my next post I will tell you what I would suggest for dessert.

Beatty’s Chocolate Cake

September 24th, 2009

I missed the first Barefoot Blogger Thursday of the month because of travel and other obligations, so I was determined not to miss the second one. Mary of Passionate Perseverance selected Ina Garten’s Beatty’s Chocolate Cake because it is her birthday. Happy birthday Mary! Unfortunately Mary had a problem with the cake. Visit her wonderful blog to see how she salvaged a near disaster. Actually, I can empathize with her. This cake was not easy. It was easy to mix and bake. The addition of a cup of coffee to the mix, made it almost too thin in my opinion. My cake did not run over in the pans as her’s did, but once I removed it from the pans after it was baked, it was very crumbly and hard to handle. Perhaps I did not bake it long enough, even though it was in the oven for the prescribed amount of time. I just knew I would not be able to pick it up and layer it. The only solution I could think of was to put the layers in the refrigerator on their cooling racks to see if it would help. The freezer is another good idea. Once they were very cold, I was able to manipulate them onto the serving plate and frost them.

This is a very good moist cake and the frosting is easy and delicious. The addition of coffee to the cake and frosting seems to bring out the chocolatey taste. The only addition I made was to sprinkle the top of the cake with toffee bits. It helped to hide the cake crumbs peeking out of the frosting! You may want to check in with the other Barefoot Bloggers to see how they did with this cake. I know I am curious.

BEATTY’S CHOCOLATE CAKE

Ingredients
Butter, for greasing the pans
1 3/4 cups all-purpose flour, plus more for pans
2 cups sugar
3/4 cups good cocoa powder
2 teaspoons baking soda
1 teaspoon baking powder
1 teaspoon kosher salt
1 cup buttermilk, shaken
1/2 cup vegetable oil
2 extra-large eggs at room temperature
1 teaspoon pure vanill extract
1 cup freshly brewed hot coffee

Directions

Chocolate Buttercream, recipe follows

Preheat the oven to 350 degrees. Butter 2 (8-inch) round cake pans. Line with parchment paper, then butter and flour the pans.

Sift the flour, sugar, cocoa, baking soda, baking powder, and salt into the bowl of an electric mixer fitted with a paddle attachment and mix on low speed until combined. In another bowl, combine the buttermilk, oil, eggs, and vanilla. With the mixer on low speed, slowly add the wet ingredients to the dry. With mixer still on low, add the coffee and stir just to combine, scraping the bottom of the bowl with a rubber spatula. Pour the batter into the prepared pans and bake for 35 to 40 minutes, until a cake tester comes out clean. Cool in the pans for 30 minutes, then turn them out onto a cooling rack and cool completely.

Place 1 layer, flat side up, on a flat plate or cake pedestal. With a knife or offset spatula, spread the top with frosting. Place the second layer on top, rounded side up, and spread the frosting evenly on the top and sides of the cake.

Chocolate Frosting:

6 ounces good semisweet chocolate (recommended: Callebaut)
1/2 pound (2 sticks) unsalted butter, at room temperature
1 extra-large egg yolk, at room temperature
1 teaspoon pure vanilla extract
1 1/4 cups sifted confectioners’ sugar
1 tablespoon instant coffee powder

Chop the chocolate and place it in a heat-proof bowl set over a pan of simmering water. Stir until just melted and set aside until cooled to room temperature.

In the bowl of an electric mixer fitted with a paddle attachment, beat the butter on medium-high speed until light yellow and fluffy, about 3 minutes. Add the egg yolk and vanilla continue beating for 3 minutes. Turn the mixer to low, gradually add the confectioners’ sugar, then beat at medium speed, scraping down the bowl as necessary, until smooth and creamy. Dissolve the coffee powder in 2 teaspoons of the hottest tap water. On low speed, add the chocolate and coffee to the butter mixture and mix until blended. Don’t whip! Spread immediately on the cooled cake.

Skillet Biscuits and a 60th Birthday

September 14th, 2009

We returned to Richlands, Virginia this past weekend. You may remember that our good friends Barbara and Jim live there. I posted about one of Barbara’s recipes here. The reason for the visit was a surprise birthday party for Barbara. It was a milestone birthday and one not to be missed. Unfortunately our husbands had planned a two week mototcycle trip that was to begin on the day of her birthday. But Jim could not bring himself to leave on her birthday, so a month of deception began. Barbara was convinced that the guys were leaving on Saturday morning. Jim packed his boots and jackets, loaded the bike, gave Barbara a token birthday present, apologized for leaving on her birthday and left. She was a good sport about it, but was depressed. While her Mother and Sister took her to a ficticious birthday lunch, Jim doubled back and everyone descended on her house and waited for her return. Her sister came up with a crazy excuse to turn around and go home and the surprise was a complete success. Here is Barbara’s real present.


They live on a mountain for heaven’s sakes, so what better present than an ATV. It is what every 60 year old biker babe should have. She is looking forward to riding the trails and visiting their log cabin on the old Kentucky Turnpike. What beautiful country this is. This is the view from their house.

After our last visit, in which I posted about Barbara’s beautiful new kitchen, Girlichef commented that I should have posted a picture of the kitchen – so here it is Girlichef.

Sunday morning the guys really prepared to leave on their trip. Barbara fixed a hardy breakfast of skillet biscuits, country ham, milk gravy and eggs. Skillet biscuits are a wonderful alternative to the biscuit challenged. According to Barbara you just follow the biscuit recipe on the self-rising flour bag, but add a little more buttermilk to make the batter of pouring consistancy and bake in a greased iron skillet until brown and cooked through. She inverted the biscuits on a plate and cut them into wedges. Breakfast was delicious and it was a fitting send off to the thoughtful men in our lives.

© Penny Klett, Lake Lure Cottage Kitchen. All rights reserved.