Chocolate, Pear, & Almond Tart

June 6th, 2009

Kate of Warm Olives and Cool Cocktails is having a Great Cookbook Giveaway. She has too many cookbooks and is giving them away to fellow food bloggers. The only stipulation she has is that the recipient needs to blog about a recipe from the book they win and mention her blog when they do, so that others will be aware of this opportunity. I was lucky enough to win her first giveaway. The book that I won was Entertain by Ed Baines. Ed Baines is a hotty. He is the chef and co-owner of Randall & Aubin champagne and oyster bar in London’s Soho. He appears on his own TV show, Ed Baines Entertains and for a time he was the official Armani chef and a model on the side. What’s not to like about the guy? He has a passion for food and grew up in a household where fresh local ingredients were the norm. My only problem was trying to figure out which of his wonderful recipes to try.


The recipe I finally chose was Chocolate, Pear & Almond Tart. For those of you who have followed my blog, you probably know that I am partial to pastries and tarts. I would be in my element in a French Patisserie. What I loved about this tart was the first burst of chocolate and orange zest in my mouth when I tasted it. To me chocolate and orange were made for each other. The almonds and pears were more subtle but balanced well with the stronger flavors. The one thing I had a problem with was the pastry. It did not brown as much as I would have liked. I think this problem could be solved by baking the tart at a higher temperature. Even though it did not brown well the pastry was excellent due to the addition of powdered sugar. Ed Baines is an excellent chef and I am pleased to own his cookbook. Thank you Kate for the gift and for inscribing a message to me. Now, all of you need to go over to her blog to take advantage of the cookbook giveaway.

CHOCOLATE, PEAR, & ALMOND TART

For the Pastry:
2 cups all purpose flour
3/4 cup confectioners’ sugar
a pinch of salt
1 stick of unsalted butter, plus more for greasing
1 egg
1 Tbls orange zest

Sift the flour, confectioners’ sugar, and salt into a large mixing bowl and mix together. Add the softened butter and using your fingertips, rub it into the flour until you have a breadcrumb consistency. In a separate bowl, whisk the egg and orange rind together with 1 tablespoon of water. Add this to the flour mixture and stir, then work the mixture together until you have a dough. Wrap the dough in plastic wrap and place in the refrigerator to rest for at least 30 minutes.

Tart Filling:
1 stick of cubed butter, softened
3 -4 fresh pears (or canned pear halves, drained) I used canned
2 ounces ground almonds
2 ounces slivered almonds
3/4 cup all purpose flour
1/2 cup sugar
4 large eggs
1/2 tsp vanilla
zest of one large orange
9 ounces dark chocolate, shredded ( I used mini chocolate chips)
1 Tbls apricot jam

Preheat the oven to 325 degrees ( I say 350 degrees). Butter a 10 inch tart pan. Peel and core the pears if fresh, then cut them into halves lenghwise. Roll out the pastry and use to line the tart pan. Prick the base of the tart with a fork several times ( this stops the pastry rising through the filling ).

In a large mixing bowl, mix the ground almonds, flour, sugar, and cubes of softened butter with your fingertips, until you have a crumble. Now add the eggs and mix well, again using your fingertips, until you have a paste. Add the vanilla extract, orange rind, shredded chocolate, and slivered almonds, and fold this mixture together.

Place the pear halves over the base of the tart shell and pour over the mixture. Bake in the oven for about 40 minutes.

While this is cooking, put the apricot jam in a saucepan with 2 tablespoons of water and heat gently to form a light syrup.

To test if the tart is properly cooked through, push in a small knife tip and remove; if nothing is sticking to it, the tart is done. Remove from the oven and lightly brush wih the apricot glaze.

This tart is best served hot, with either ice cream or custard flavored with a dash of Amaretto.

Printable Recipe

Sunday Brunch Part 5 – Charlotte Malakoff and Outrageous Brownies

May 28th, 2009

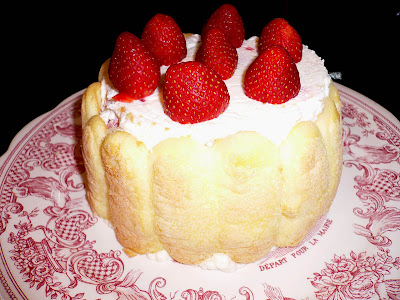
There are two dessert offerings for this brunch. The first dessert takes advantage of the fresh strawberries that are currently coming out of South Carolina. It also takes me on a trip down memory lane because Charlotte Malakoff was one the first gourmet desserts that I prepared in the 70’s. I bought a special tin charlotte mold and loved the contours of it and the heart shaped handles. Recently while unpacking kitchen boxes after our permanent move to Lake Lure, I unearthed this treasure and decided that charlottes of all description would be in our future.


A Charlotte Malakoff is made with Ladyfingers surrounding a filling of whipped butter, sugar, cream and strawberries. Sometimes the lady fingers are soaked in Kirsch. I chose not to soak them at all in this rendition. Another element in the flavoring is almonds; in this case ground almonds. Charlottes can be flavored with chocolate, pumpkin or peaches or any flavoring that appeals to you. If you do not have a charlotte mold you can use a souffle dish.

CHARLOTTE MALAKOFF

Enough Lady fingers to line the sides of the mold
1/2 cup unsalted butter, softened
1/2 cup sugar
2 ounce package of sliced almonds, ground
1/2 tsp almond extract
2 cups heavy cream, whipped
1 pint of strawberries
Line the bottom of a charlotte mold or souffle dish with waxed paper. Arrange lady fingers in a circle around sides of mold.
Cream the butter and sugar until light and fluffy. Beat in the ground almonds and almond extract. Gently fold the mixture into whipped cream.
Save 6 nice strawberries for the top. Cut the rest into fourths and fold into whipped cream mixture. Place the mixture into ther mold. Chill for at least 2 hours.
To serve, unmold the charlotte onto a serving dish and remove the wax paper. Decorate with the whole strawberries.

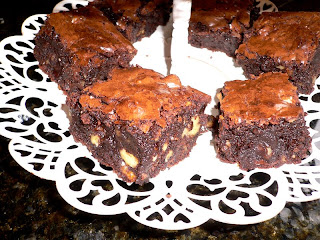
Since this is Barefoot Blogger Thursday, I decided to include Ina’s Outrageous Brownies as part of my brunch menu. Thank you Eva of I’m Boring for choosing this decadent dessert. I have actually made these brownies before so I knew that everyone would be in for a treat with this dish. They are rich, but very easy to prepare and there is nothing better than a little chocolate to round out a satisfying meal. Thank you for following me on the never ending (or so it seemed) brunch party. It was fun for me to put together and I enjoyed having all of you come along.

OUTRAGEOUS BROWNIES ( I halved this recipe )
1 pound unsalted butter
1 pound plus 12 ounces semisweet chocolate chips
6 ounces unsweetened chocolate
6 extra large eggs
3 Tbls instant coffee granules
2 Tbls pure vanilla extract
2 1/4 cups sugar
1 1/4 cups all purpose flour
1 Tbls baking powder
1 tsp salt
3 cups chopped walnuts

Preheat the oven to 350 degrees. Butter and flour a 12 x 18 x 1 inch baking sheet.
Melt together the butter, 1 pound of chocolate chips, and the unsweetened chocolate in a medium bowl over simmering water. Allow to cool slightly. In a large bowl, stir (do not beat) together the eggs, coffee granules, vanilla, and sugar. Stir the warm chocolate mixture into the egg mixture and allow to cool to room temperature.
In a medium bowl, sift together 1 cup of flour, the baking powder, and salt. Add to the cooled chocolate mixture. Toss the walnuts and 12 ounces of chocolate chips in a medium bowl with 1/4 cup flour, then add them to the chocolate batter. Pour into the baking sheet.
Bake for 20 minutes, then rap the baking sheet against the oven shelf to force the air to escape from between the pan and the brownie dough. Bake for about 15 minutes, until a toothpick comes out clean. Do not overbake! Allow to cool thoroughly, refrigerate, and cut into 20 large squares.

Blueberry Pudding Cake

April 18th, 2009


I haven’t done much grocery shopping since we returned to Lake Lure. Our meals have been very simple; grilled meat, baked sweet potatoes and frozen vegies. Breakfast has been cereal and english muffins. Lunch has been sandwiches or leftovers. The reason I have not filled the larder is because the larder looks like this.


David is working hard to get the pantry finished and the shelves will go in this weekend. I can hardly wait. I picture rows of canned goods, baskets with condiments sorted by cuisines, a large bread tin, and glass containers with various flours, rices and pastas, all labeled and neat. The reality is that I am much more organized in my mind than I am in accomplishment. But I will try to keep it in order.

I was in the mood for something sweet for breakfast the other day and had the baking basics on hand and an old Gourmet magazine in hand when I found a recipe for this blueberry pudding cake. I had some blueberries that I brought from Florida in the freezer so it was a fait accompli. This recipe was in the July 2005 issue of Gourmet and was featured in their Gourmet Every Day Quick Kitchen. It is indeed quick and the resulting cake is moist and crumbly and oh so good with freshly brewed coffee.

BLUEBERRY PUDDING CAKE

1/3 cup plus 1/2 cup sugar
1/4 cup water ( use less for frozen berries)
1 Tablespoon fresh lemon juice ( I left it out )
1 teaspoon cornstarch
10 oz. blueberries ( 2 cups )
1 cup all purpose flour
1 3/4 teaspoons baking powder
1 teaspoon salt
1 large egg
1/2 cup whole milk
1 stick unsalted butter, melted and cooled slightly
1 teaspoon vanilla

Put oven rack in middle position and preheat oven to 375 degrees. Butter a 9 inch square baking pan.

Stir together 1/3 cup sugar with water, lemon juice, and cornstarch in a small saucepan, then stir in blueberries. Bring to a simmer, then simmer, stirring occasionally, 3 minutes. Remove from heat.

Whisk together flour, baking powder, salt and remaining 1/2 cup sugar in a medium bowl. Whisk together egg, milk, butter, and vanilla in a large bowl, then add flour mixture whisking until just combined.

Spoon batter into baking pan, spreading evenly, then pour blueberry mixture evenly over batter (berries will sink). Bake until a knife inserted into center of cake portion comes out clean, 25 to 30 minutes. Cool in pan on a rack 5 minutes.

Printable recipe

Tomato and Goat Cheese Tarts

March 26th, 2009

It is Barefoot Blogger Thursday and the Barefoot Contessa recipe chosen this week by Anne of Anne Strawberry is Tomato and Goat Cheese Tarts. Please visit her blog for a unique take on this recipe. The thing I like about the Barefoot Bloggers is their creativity in adapting recipes to their own tastes and situations. In my case, I chose to use oven roasted plum tomatoes rather than the slice of tomato called for in the recipe. Oven roasting gives winter tomatoes more deepth of flavor. I cut six plum tomatoes in half, drizzled them with olive oil, balsamic vinegar, salt and pepper, and a sprinkling of fresh rosemary and roasted them cut side down for 30 minutes in a 400 degree oven.

As usual for an Ina Garten dish, the flavors in the tart married well. The sauteed onions smelled heavenly when splashed with white wine and thyme and their mellowness was offset by the pungency of the goat cheese. I had a bit of sausage left over from another meal and added that on top of the goat cheese. The tomatoes added a rich topping to the tart.

The only problem I had with making the tarts was with the puff pastry. I have mentioned this before in another post but failed to heed my own advice. Parchment paper is oven safe to 400 degrees and the tarts bake at 425 degrees. The tarts were a little overdone and the parchment paper was toast. Fortunately, the taste was still wonderful and I will definitely make them again with a few adjustments. Using a silpat liner would be a good alternative, or baking them at a lower temperature would be good. I am open to suggestions from my fellow BBs.
TOMATO AND GOAT CHEESE TARTS

1 package puff pastry, defrosted
Good olive oil
4 cups thinly sliced yellow onions ( 2 large )
3 large garlic cloves, cut into thin slivers
Kosher salt and freshly ground black pepper
3 tablespoons dry white wine
2 teaspoons minced fresh thyme leaves
4 tablespoons freshly grated Parmesan, plus 2 ounces shaved with a vegetable peeler
4 ounces garlic and herb goat cheese (recommended: Mantrachet)
1 large tomato, cut into 4 (1/4 inch thick ) slices
3 tablespoons julienned basil leaves

Unfold a sheet of puff pastry on a lightly floured surface and roll it lightly to an 11 by 11 inch square. Using a 6 inch wide saucer or other round object as a guide, cut 2 circles from the sheet of puff pastry, discarding the scraps. Repeat with the second pastry sheet to make 4 circles in all. Place the pastry circles on 2 sheet pans lined with parchment paper and refrigerate until ready to use.
Preheat the oven to 425 degrees F.

Heat 3 tablespoons of olive oil in a large skillet over medium to low heat and add the onions and garlic. Saute for 15 to 20 minutes, stirring frequently, until the onions are limp and there is almost no moisture remaining in the skillet. Add 1/2 teaspoon salt, 1/4 teaspoon pepper, the wine, and thyme and continue to cook for another 10 minutes, until the onions are lightly browned. Remove from the heat.

Using a sharp paring knife, score a 1/4 inch wide border around each pastry circle. Prick the pastry inside the score lines with the tines of a fork and sprinkle a tablespoon of grated Parmesan on each round, staying inside the scored border.

Place 1/4 of the onion mixtue on each circle, again staying with the scored edge. Crumble 1 ounce of goat cheese on top of the onions. Place a slice of tomato in the center of each tart. Brush the tomato lightly with olive oil and sprinkle with basil, salt, and pepper. Finally, scatter 4 to 5 shards of Parmesan on each tart.

Bake for 20 to 25 minutes, until the pastry is golden brown. The bottom sheet pan may need an extra few minutes in the oven. Serve hot or warm.

Printable recipe

Scandinavian Tea Cookies

March 19th, 2009

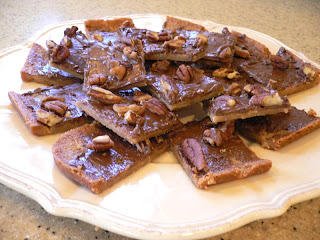
I am seriously addicted to these cookies. The recipe came from a co-worker whose Mother ran a gourmet cooking store and school. I have no idea where the name originated and, as a matter of fact the name on the recipe was Scandinavian Tea Cake. This made no sense to me because a Scandinavian tea cake is usually a yeasty concoction and these cookies are buttery and crisp. So I have officially renamed the recipe.

They are very easy to assemble and use very few ingredients. The only difficult part of the recipe is grating the chocolate bars and I have simplified that by using chocolate chips. Now if you are a chocolate purist, you could use a high quality milk chocolate bar and they would be even better. One day when I have better gourmet choices at the grocery store I will use a fine quality chocolate. In the past I have used 6 Hershey’s Milk Chocolate bars, but they were difficult to grate and I had to keep returning them to the fridge to harden enough to take the grate. This time I used Nestle’s Milk Chocolate Chips and they melted and spread very easily. It is hard to go wrong with this recipe. And wouldn’t they be excellent for tea with my Chicken Almond Tea Sandwiches?

SCANDINAVIAN TEA COOKIES

1 cup butter, softened
1 cup brown sugar
1 egg yolk
1 cup unbleached flour
6 (1.05 oz.) milk chocolate bars, grated ( I used 7 oz. milk chocolate chips)
2/3 cup chopped pecans

Preheat oven to 350 degrees

In a medium mixing bowl, cream butter, sugar, and egg yolk until very smooth. Gradually add flour until well blended. Spread dough on lightly greased 15 1/2″x10 1/2″x 1″ sheet pan. Bake for 15 to 20 minutes until medium brown. Sprinkle chocolate shavings or chips evenly over cake. Put in oven to melt and when warmed remove from oven and spread over top. Sprinkle with nuts. Cut into squares when cool.

Printable recipe

© Penny Klett, Lake Lure Cottage Kitchen. All rights reserved.