Labor Day Pig Out

September 14th, 2010

David (Mr Lake Lure Cottage Kitchen) here again. Penny asked me to write about some of our Labor Day food….specifically, the BBQ part that I was responsible for. We had a house full of extended family here for the long weekend, and everyone pitched-in in the kitchen.  Needless to say we ate well…you might even say “high on the hog”, at least as high as the shoulder.

As of late, I have been inspired by another Dave, the one responsible for the blog My Year On The Grill (MYOTG),  not to mention the inspiration I always get from Bobby Flay and The Neely’s on The Food Network.  It was actually a Neely’s episode back in April about how to smoke spare ribs at home that inspired me buy a Char-Griller off-set charcoal smoker grill.  I christened the grill by cooking some ribs following the Neely’s dry rub recipe and techniques, and I must say they were some pretty tasty ribs.  I was then ready to step it up a notch and tackle some Carolina Pulled Pork, i.e. Pork Butt, which is kind of an odd name for what is in reality a pork shoulder. For detailed instructions on smoking a Pork Butt (it’s a lot more fun to say than shoulder) I referred to MYOTG.  MYOTG Dave is doing for Steve Raichlen’s book How To Grill what Julie Powell did for (or some might say to) Julia Child’s Mastering The Art Of French Cooking…cooking his way through the book, one recipe at a time. Dave has many detailed recipes and instructions on his blog, and his info on Pork Butts was exceedingly helpful in my quest to achieve a nice Butt.  I was particularly interested in his comments on using coffee in the dry rub. After reading MYOTG’s musings on pork butts and studying Steve Raichlen’s and Pat Neely’s recipes, and never being one to leave-well-enough-alone, I concocted my own java dry rub with this formula.

1    Cup white sugar
1    Cup brown sugar
3/4 Cup paprika
1/2 Cup ground coffee
3    Tablespoons onion powder
3    Tablespoons black pepper
2    Tablespoons course salt
2    Teaspoons garlic powder
2    Teaspoons cocoa powder
1    Teaspoon cayenne pepper
1    Teaspoon ground cumin
1    Teaspoon ground coriander

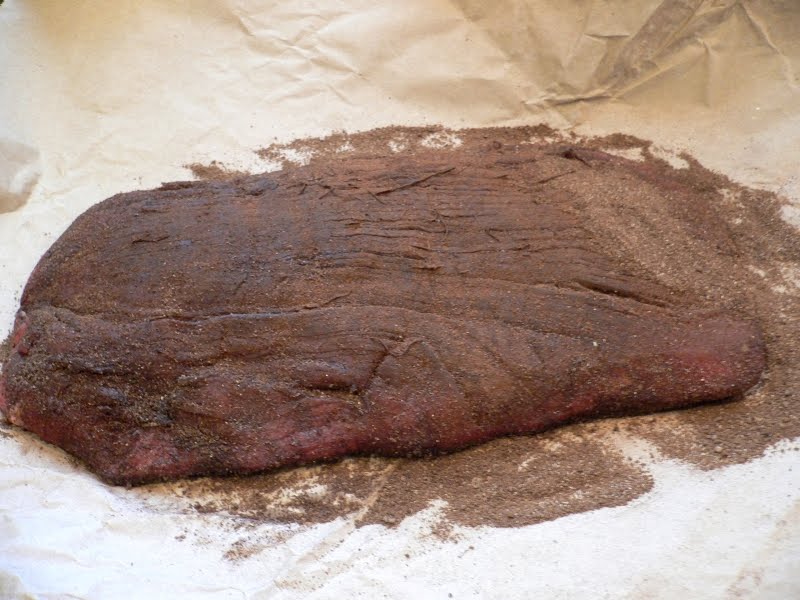
The only picture I thought to take during the Butt cooking process was this one showing the rub on the raw Butt, which I then let sit in the fridge over-night.

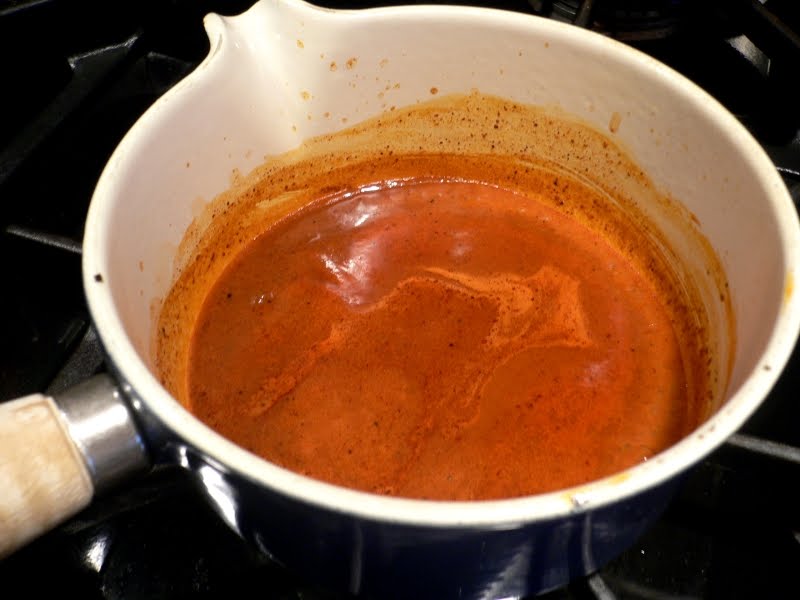
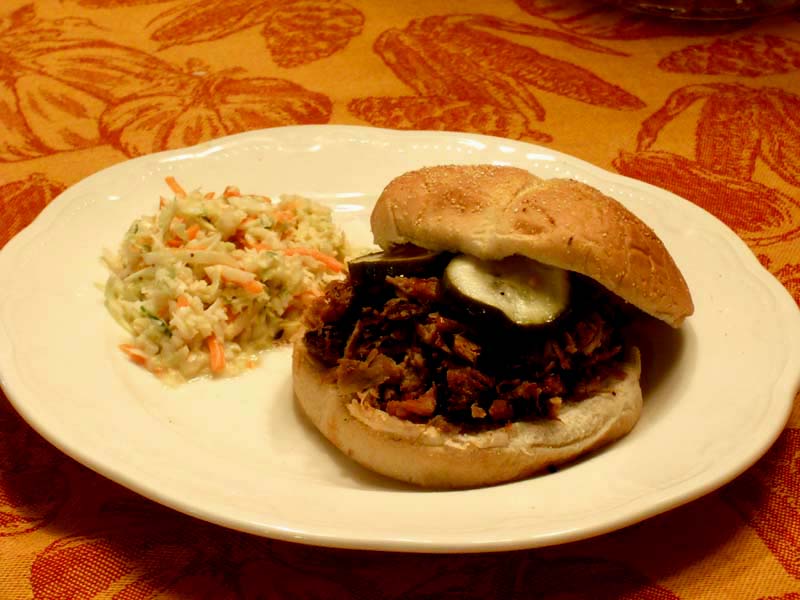
For the mop sauce and Carolina vinegar finishing sauce I made up some of MYOTG’s  Raspberry Chipotle Sauce Concentrate and added it to Steve Raichlen’s standard mop and vinegar finishing sauce just like Dave suggested.  I forgot to take a picture of the butts on the grill or after they had cooked for 9 hours, so the only photo of the finished product is the sandwich shot above.

For sides, we did MYOTG’s Blue Cheese Potato Salad and Smoked Beans, both of which are described here.  I had quite a struggle convincing Penny to even let me make the Blue Cheese Potato Salad…she has an aversion to blue cheese for some reason. In the end, she caved in, and guess what….she actually liked it. The blue cheese is not over-powering if you follow Dave’s recipe. 

 
I had actually been making smoked beans very similar to Dave’s since I got my smoker.  The main difference between mine and Dave’s being the additional bean varieties Dave throws into the mix. Where I had been using only Bush’s baked beans as the base, he adds a can of pinto’s and  a can of great northern’s to the pot….a worthwhile addition.  The smoked beans need to include smoked pork of some variety.  I had some smoked ribs in the freezer, so I chopped some up and threw it in the pot along with a little leftover andouille sausage.  I left the bean pot in the smoker, under the pork butts to catch some of the drippings, for three or four hours.  They were pretty yummy beans.

Penny whipped up some coleslaw following a Bobby Flay recipe.  All in all, a very satisfying all-American Labor Day feast.  Thanks for the recipes Dave, and the advice on how to cook a good Butt.

Oven-Fried Chicken from The Barefoot Contessa

August 29th, 2010

The Barefoot Bloggers are on a leisurely summer schedule.  Normally we post recipes from the Barefoot Contessa on the 2nd and 4th Thursdays of the month, but our fearless leader Tara of Smells Like Home has decreed that as long as we get our recipes posted by the end of each month, we are still in the game.  And what a great time to be a member of The Barefoot Bloggers.  Ina Garten has a new cookbook coming out in October called How easy is That?  Tara received an advanced copy of it and had a phone interview with Ina in mid August.  She will be posting about it on October 11th on the Barefoot Blogger website. It is nice to know that Ina recognizes our little group and is supportive of us.

One of our recipes for this month was Ina’s oven-fried chicken.  It was chosen by Vicki of My Fare Lady.  I am happy that she made this choice because I gave up on frying chicken a long time ago.  I decided that fried chicken just wasn’t good for us and  that it was a messy task.  Leave it to The Barefoot Contessa to simplify the process by frying the chicken briefly in oil and then baking it until it is done.  It still comes out crispy and delicious.  I have also come to the conclusion that enjoying fried chicken occasionally is no worse for me than any other food indulgence.  It is all about moderation and variety.

I followed the recipe closely other than skinning the chicken.  I used all thighs, but whole chicken pieces are fine too.  The chicken marinates overnight in buttermilk.  This makes the chicken very juicy and succulent.  So don’t forget this important step.  The next time I make it, I will add some interesting spices.  The chicken was delicious, but it would be even better with a punch of garlic, paprika or whatever The Colonel puts in his famous chicken.  So feel free to indulge in this great dish.  How bad can that be?

OVEN-FRIED CHICKEN

2 chickens, cut in eight serving pieces
1 quart buttermilk
2 cups all-purpose flour
1 tablespoon kosher salt
1 tablespoon freshly ground black pepper
Vegetable oil

Place the chicken pieces in a large bowl and pour the buttermilk over them.  Cover with plastic wrap and refrigerate overnight.

Prehieat the oven to 350 degrees.

Combine the flour, salt and pepper in a large bowl.  Take the chicken out of the buttermilk and coat each piece thoroughly with the flour mixture.  Pour the oil into a large heavy-bottomed stockpot to a depth of 1 inch and heat to 360 degrees on a thermometer.

Working in batches, carefully place several pieces of chicken in the oil and fry for about 3 minutes on each side until the coating is a light golden brown (it will contiune to brown in the oven).  Don’t crowd the pieces.  Remove the chicken from the oil and place each piece on a metal baking rack set on a sheet pan.  Allow the oil to return to 360 degrees before frying the next batch.  When all the chicken is fried, bake for 30 to 40 minutes, until the chicken is no longer pink inside.  Serve hot.

Printable recipe

Shrimp Scampi Pasta with Grilled Cantaloupe

August 13th, 2010

My husband is the seafood cook in our house.  He is always suprising me with the quality of the dishes he turns out.  I usually try to stay out of his way while he is in the kitchen because it is hard for me to turn over the job to him without commenting on the way he is doing things.  I am a control freak in that way.  So I let him get creative and then I clean up the mess when he is finished.  It is always worth it.

Shrimp scampi is so delightful and so rich.  It is even better when that richness is tempered with angel hair pasta which soaks up all of the buttery goodness.  He found a recipe on Epicurious and adapted it to his liking.  We are both big fans of lemon flavors and capers so he added them to the recipe.  This was such a refreshing pasta dish.  I could have eaten the whole bowl.  It was also very simple to make and didn’t require a whole lot of clean up by the sous chef.

With the pasta, he grilled a tasty cantaloupe recipe that we have been making for a few years.  The original recipe came from one of the Food Network Stars who did not actually win, but her recipes were featured in Bon Appeptit magazine.  The cantaloupe does not spend much time on the grill;  just enough time to give it the grill marks and warm it.  It is seasoned with honey and cayenne pepper.  It is an explosion of flavor on your palate!  Hope you enjoy these recipes.  It is so very much worth it to share the cooking.
SHRIMP SCAMPI PASTA
1/4 cup olive oil
1 lb peeled and deveined large shrimp (raw; 20 to 25 per lb)
4 large garlic cloves, forced through a garlic press
1/2 teaspoon dried hot red-pepper flakes
zest of one lemon
Juice of one lemon
3 tablespoons drained capers
1/2 cup dry white wine
1 teaspoon salt or to taste
1/2 teaspoon freshly ground black pepper
5 tablespoons unsalted butter
3/4 lb angel hair pasta
1/2 cup chopped fresh flat-leaf parsley
Bring a large stock pot of salted water to a boil.
Meanwhile, heat oil in a 12 inch heavy skillet over moderately high heat until hot but not smoking, then saute shrimp, turning over once, until just cooked through, about 2 minutes, and transfer with a slotted spoon to a large bowl.  Add garlic to oil remaining in skillet along with red pepper flakes, lemon zest, lemon juice, capers, wine, salt, and pepper and cook over high heat, stirring occasionally, 1 minute.  Add butter to skillet, stirring until melted, and stir in shrimp.  Remove skillet from heat.
Cook pasta in boiling water until just tender.  Reserve 1 cup pasta cooking water, then drain pasta in a colander.  Toss pasta well with shrimp mixture and parsley in large bowl, adding some of the reserved cooking water if necessary to keep moist. 
GRILLED CANTALOUPE ( Recipe courtesy of Rory Schepisi)
1 cantaloupe peeled and cut into wedges
honey to taste
cayenne pepper to taste
Grill cantaloupe slices on 1 side until showing grill marks, about 3 minutes.  Turn and grill for another minute.  Mound grilled side up on platter.  Brush with honey; sprinkle with cayenne pepper. 
Note:  It seems I forgot how to spell cantaloupe. Thanks for the wake up call in your comments. I checked the spelling in my copy of Food Lover’s Companion.

Braised Beef in Polenta Cups with Plum Chipotle Sauce

August 4th, 2010

Once a month one of our local restaurants, Larkins on the Lake, hosts a wine tasting dinner.  We always attend.  The prices are reasonable ( $25.00 a person ), the sommelier is knowledgable, and the food is excellent.  If there is a wine that we are particularily fond of they are generous with the pours and we have never left feeling deprived of a good meal.  One of the food selections this month was Braised Beef in Polenta Cups with Plum Chipotle Sauce.  The chef has offered to share recipes with me, but I have been so busy that I have not asked him.  But I could not get this dish out of my mind.  I can just imagine it as an interesting appetizer at any get together.  It would also be adaptable to so many fillings.  If you were pressed for time you could get some barbecue from your local smokehouse or you could make it vegetarian with a black bean salsa.  The combinations are endless.  So I decided to experiment.

First I made polenta by following the directions on the package.  Once it was thick, I poured it on to a wax paper lined sheet pan with high sides.  I refrigerated it overnight.  Once it was cold, it was easy to cut out into 2 inch rounds.  Then using a 1/2 teaspoon measure or other spoon, you scoop out some of the center.  These will hold in the refrigerator until you are ready to warm and fill them.

Once heated you can fill them with anything that appeals to you.  Since I had a busy day yesterday shopping with my blogging buddy Penny of The Comforts of Home ( go to her website to see where we went),  I put a chuck roast in the crockpot with a little Barbecue sauce and beef broth and left it all day.  It was fork tender by the time I heated the polenta cups.

I shredded the beef and placed spoonfuls into the polenta cups and then topped them with a sauce that I made from plum jam, a little barbecue sauce and a bit of chipotle powder.

They were every bit as good as the polenta cups we had at the restaurant.  The recommended wine with this appetizer was a Southern Belle Shiraz, Australia, 2008.

BRAISED BEEF IN POLENTA CUPS WITH PLUM CHIPOTLE SAUCE

For the Polenta: (Adapted from the Food Channel)
8 cups chicken stock
2 cups polenta
3 tablespoons butter

Note:  I halved the recipe for just the two of us and used a smaller sheet pan.  I got about 24 2-inch polenta rounds.

Bring chicken stock to a simmer and whisk in polenta.  Cook according to package directions until polenta is thick.  Add butter.  Line a rimmed baking sheet with wax paper.  Pour polenta onto tray and spread evely to 1-inch thickness.  Cool to room temperature and place in refrigerator, covered until ready to use.  (At least two hours).

When polenta is chilled and firm, remove it from the refrigerator and cut it into 2-inch rounds with a biscuit or cookie cutter.  Scoop out the centers with a 1/2 inch measuring spoon or any small spoon, being careful not to make a hole in the bottom.  These can be prepared a day or two in advance.  When you are ready to fill them you can warm them in a 250 degree oven until they are hot.

For the Beef:
3 to 4 pound Chuck roast
1/2 cup barbecue sauce
1 cup beef broth

Brown the beef on both sides in a little olive oil.  Place in crockpot and add the barbecue sauce and the beef broth.  Cook on low for 8 to 10 hours.  Remove from crockpot and shred with two forks.

For the Plum Sauce:
1/2 to 3/4 cups plum jam or preserves
1 to 2 tablespoons barbecue sauce
1/8 tsp. chipotle powder of chili powder

Heat the three ingredients together in a small saucepan until the jam is like a glaze.

Assemble:
Top the warmed polenta cups with the shredded beef.  Spoon the jam sauce on top and sprinkle with parsley.

I hope this has inspired you to get creative with this recipe.  I would love to hear some of your ideas.

Printable recipe

Grilled Mole Flank Steak

July 27th, 2010
We have been experimenting with spice rubs lately and while I was visiting my Son and Daughter-In-Law in Cary, Kristen made an extraordinary flank steak with a mole spice rub.  A mole is literally a “concoction” in Mexican cuisine.  It is a thick sauce which contains peppers, spices such as cinnamon, and always some chocolate.  Last night I decided to experiment with her recipe.  To duplicate the flavors of a mole sauce for my dry rub, I used chipotle chili powder, brown sugar, garlic powder, cocoa powder, and cinnamon.  
Granted, the above picture would never make the cover of Food and Wine magazine, but you get the general idea of the liberal coating of dry rub.  Also notice the old fashioned butcher paper in which the beef was wrapped.  I have been shopping lately at Greenlife Grocery in Asheville and they carry Brasstown Beef from Brasstown, NC.  Their motto is ” Real Beef, Raised Right, Around Here”.  Not only is their beef raised without antibiotics or added hormones, but it is dry aged as well.  Dry aging concentrates the beef flavor and takes at least two weeks.  Very few organic farmers do this because the water loss diminishes the weight of the beef by 9%, thus reducing the profit.  The advantage to the consumer is beef with more intense beef flavor.  Another interesting point from their brochure:  “Our hamburger is 100% comprised of meat from our animals; unlike most commercially available hamburger, which usually contains beef and beef by products from numerous different animals, old and young alike from throughout the country and imported from abroad.  Everybody who has ever eaten our hamburger thinks that it is the best that they ever had.”  Hmmm, Makes you wonder what is in that tube of hamburger meat in the Supermarket!
Another reason that I decided to do a mole rub on my steak was because of this attractive jar of Mole Negro that Michael and Kristen brought me from a recent trip to Mexico.  It has been sitting in my pantry waiting for just the right recipe.
Because this sauce is very thick, I used just 1/4 of a cup of the sauce in one cup of beef broth.  It has beautiful color. 
It was perfect drizzled over the flank steak.  Here is a link for ordering the sauce, but it appears to be out of stock at the moment.  Even without the mole sauce the spice rubbed flank steak is worth making.
GRILLED MOLE FLANK STEAK
1 1/2 pounds of Flank Steak
2 Tablespoons brown sugar
1 1/2 teaspoons chipotle chili powder ( or regular chili powder )
1 1/2 teaspoons garlic powder
1 1/2 teaspoons unsweetened cocoa
1/2 teaspoon coarse-grained salt
1/2 teaspoon cracked black peppercorns
1/4 teaspoon cinnamon
Mix together the dry ingredients and coat both sides of the flank steak with them.  Let rest for 20 minutes while you light the grill.  Coat grilling rack with cooking spray.  Grill steak to desired doneness.
I am entering this post in the Two for Tuesdays blog hop.  We are all cooking up delicious meals with an emphasis on seasonal and fresh ingredients.  Hop on over to see what is happening.

© Penny Klett, Lake Lure Cottage Kitchen. All rights reserved.