Onion and Bacon Tart

January 26th, 2016

Onion and Bacon Tart 5

I dare anyone to tell me that they wouldn’t love to eat a combination of buttery flaky pastry with caramelized onions and crispy bacon.  The current contest on the FOOD52 website is to present your favorite appetizer to share with friends.  This is not my recipe.  It belongs to Cathy of the blog Bread-and-Milk.   I didn’t enter the contest, but I did decide to be a recipe tester.  I guess you can figure out why I chose the Onion and Bacon Tart to test. My middle name should be “Tart”, but not in the pejorative sense.  Whether sweet or savory, some of my favorite eats have been tarts.

Onion and Bacon Tart 1When I first read the recipe for this tart, I thought there was way too much filling for the size of the tart pan.  But after the onions were caramelized to a deep golden brown, they had melted to just the right amount.  There is a small amount of egg and cream to bind everything together so that the filling is lusciously rich.  I do need to mention the pastry also.  It has more butter in it than what I would normally use.  But the finished pastry is very sturdy.  That is just the results that work for this appetizer.  You can pick up a small slice and eat it out of hand.

Onion and Bacon Tart 3
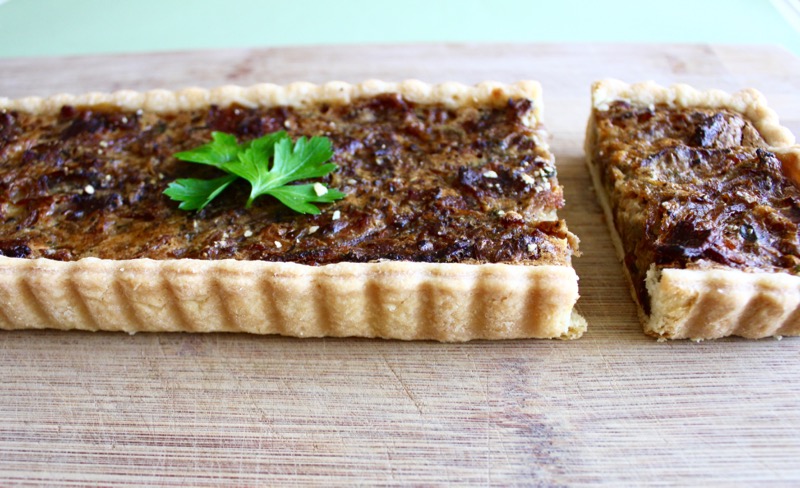
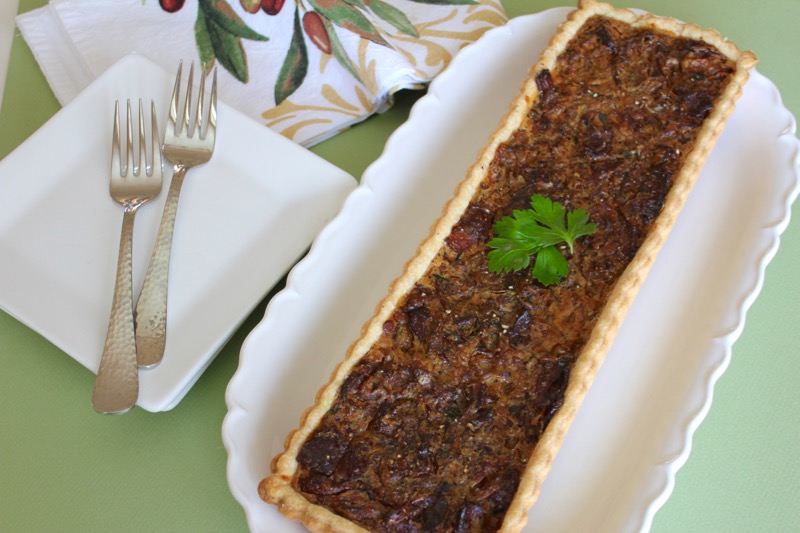
The slice shown on the plate could easily be divided into two pieces and served on a platter to be passed around.  It would be a neat two bite appetizer.  But I was not hosting a cocktail party, so David and I enjoyed this savory tart with a green salad for dinner.  I love testing other people’s recipes.  It forces me to follow a recipe as written and suspend judgement.  In this case, Cathy knew exactly what she was preparing and I was happy to follow her lead.  Go on over to Food52 to see all of the wonderful appetizer recipes.

ONION AND BACON TART

Dough

  • cups All purpose flour
  • teaspoon Salt
  • cup Unsalted butter
  • 1/4 cup Ice water

Onion Filling

  • Onions, thinly sliced
  • tablespoons Butter infused olive oil
  • 1/2 pound Thick cut Bacon, diced
  • 1/2cup Heavy cream
  • Egg
  • tablespoon Thyme
  • teaspoon Rosemary
  • 1/2 teaspoon Garlic powder
    1. Prepare dough, combine flour salt and butter in a food processor. Pulse until small balls form then add water until dough comes together. Roll into a disk and cover with plastic wrap, refrigerate for 30 minutes.
    2. Prepare Filling, heat olive oil in a nonstick and gently sauté onions until translucent and caramelized. Next sauté bacon, until crisp. Combine onions, bacon, cream, egg and thyme rosemary and garlic powder.
    3. Pre-heat oven to 375°. Roll out dough, 1/8 inch thick and press into a 4 X 13 rectangular tart tin. Dock the dough with a fork. Spoon in the onion mixture and top with salt and pepper bake for 45 minutes or until lightly browned.

Printable Recipe

Crock Pot White Bean and Sausage Soup

January 7th, 2016

Crock Pot White Beans 2

Guess what I got for Christmas?  Yes, I broke down and asked for a new crock pot.  I thought long and hard about it.  I own two; one in Lake Lure and one in Florida.  The one in Lake Lure died this year and the one in Florida was on its last legs.  Both were very, very old.  My hesitation came because I don’t use a crock pot all that often and I thought maybe I could do without one.  But there are times when they come in handy and this new one has some features that my old ones did not have, including a meat temperature probe and a programmable set and forget cooking mode.

Crock Pot White Beans 1


A warming soup sounded like the best first recipe to try in the new slow cooker.  It has been rainy and cool in Florida since the holidays, so while I dismantled the Christmas decorations I set the crock pot up to take care of our dinner.  I soaked the dried cannellini beans overnight to give them a head start.  To the pot I also added sauteed turkey kielbasa, sauteed red peppers, celery and onions with garlic and tomato paste.  The liquid ingredients were a mixture of chicken broth and water.  Near the end of cooking I added diced canned tomatoes and Tuscan kale.

Crock Pot White beans 4

Top this lovely soup with toasted bread crumbs and you will feel warm and happy.  I am happy that I have a new crock pot.

CROCK POT WHITE BEAN AND SAUSAGE SOUP (Adapted from William Sonoma)

    • 3 Tbs. olive oil
    • 2 lb. kielbasa sausages, cut into rounds
    • 1 large yellow onion, diced
    • 3 celery stalks, diced
    • 2 red bell peppers, seeded and diced
    • 1 Tbs. tomato paste
    • 3 garlic cloves, minced
    • Red pepper flakes, to taste (optional)
    • 4 cups chicken stock
    • 2 cups water
    • 1 bay leaf
    • 1 fresh thyme sprig
    • 1 fresh rosemary sprig
    • 1 fresh sage sprig
    • 1  lb. dried cannellini beans, rinsed, soaked overnight and drained
    • 1 can (14 1/2 oz.) diced tomatoes, drained
    • 1 cup fresh bread crumbs
    • 1 Tbs. unsalted butter, melted
    • Salt and freshly ground black pepper, to taste
    • 1 bunch Tuscan or regular kale, washed, stemmed and chopped, about 3 cups

    Drain soaked cannellini beans and add to crock pot.  In a large skillet saute kielbasa rounds until lightly browned.  Add to crock pot.  In same skillet saute onion, celery and red bell peppers until wilted.  Add the tomato paste, garlic and pepper flakes and stir together until mixture is fragrant.  Add the mixture to the crock pot along with the chicken broth and water.  Place the bay leaf and a tied bundle of the herbs, plus the salt and pepper to the pot.  Stir to combine.

    Cook the soup on low for 8 hours.  1/2 hour before soup is done, add the drained diced tomatoes and the kale.  Stir into soup.  Return lid to crock pot and continue to cook until kale is wilted, about 1/2 hour.  In a small pan melt butter, add bread crumbs and cook until bread is golden brown.  Ladle soup into bowls and top with bread crumbs.

Printable Recipe

Harvest Focaccia

February 8th, 2015

Harvest Focaccia 1

Known as Schiacciata con l’uva in Tuscany, this grape harvest focaccia is showcased in the windows of bakeries all over the region during the Fall harvest season.  According to Angelo Ciardella, a retired restauranteur and cooking teacher, “In Italy we don’t have Thanksgiving.  It’s the time of the grapes.”  The bread appears only during September when the uva fragola or concord grapes are ripe.  The focaccia is studded with the grapes, raisins, and walnuts and sprinkled with rosemary.  In the version I made, the grapes were layered in the bread dough so that they were more evenly distributed.  The top was also sprinkled with coriander seeds and turbinado sugar to bring out the sweetness of the grapes.

You may be wondering why I would be posting about this recipe in February instead of September.  The reason is that we will be in Tuscany during September this year during the harvest season . I found this recipe while doing research.  Planning a trip is satisfying on so many levels.  Researching the food of the regions where you will be staying is one of the sensory delights.  Another is finding interesting places to stay.

Tuscany Kitchen

This is the kitchen of one of the villas we are considering in a small village near Lucca and Florence.

Tuscany Fireplace

The villa also has a beautiful open fireplace.  We are still working out the details of our trip.  What fun it would be to stay here for a few days.

Harvest Focaccia 2V

Because I didn’t have access to concord grapes I used seedless red grapes.  The flavor is not as intense as it would be with the wine grapes, but we had no complaints about this delicious bread.  This Schiacciata (skee-ah-chah-tah) con l’uva was the closest I could come to the authentic bread experience.  It will be interesting to taste the real thing.  What I loved about this recipe is that it had a stick of butter in it.  It gave the focaccia an almost cake-like consistency.

Harvest Focaccia 3

Buon Appetito!

HARVEST FOCACCIA (Food Network Magazine)

2 1/4-ounce packets active dry yeast (1 1/2 tablespoons)
3/4 cup extra-virgin olive oil
1/4 cup plus 1 tablespoon turbinado sugar
1 tablespoon plus 3/4 teaspoon kosher salt
2 1/4 cups all-purpose flour
2 1/4 cups bread flour
1 stick cold unsalted butter, cut into 12 pieces
2 cups (about 1 pound) seedless red grapes
2/3 cup raisins
1 cup walnuts, coarsely chopped
1 teaspoon coriander seeds, cracked with a heavy pan
1 teaspoon minced fresh rosemary
1/2 teaspoon freshly ground pepper

Put 1 3/4 cups lukewarm water, the yeast, 1/2 cup olive oil and 1 tablespoon each turbinado sugar and salt in the bowl of a stand mixer fitted with the dough hook attachment.  Mix on medium speed until the yeast and sugar dissolve, then let stand until foamy, about 10 minutes.  Add both flours and mix on medium speed to make a smooth but stick dough, about 4 minutes.

Poke the butter pieces into the dough, spacing them evenly apart. (Do not mix.)  Cover the dough with plastic wrap and set aside in a wam place until doubled in size, 45 minutes to 1 hour.

Mix the dough with the dough hook on low speed just until there are streaks of butter throughout, about 1 minute.  Put the grapes and raisins in a microwave-safe bowl, cover loosely and microwave until juicy, about 10 minutes.  Let cool, the strain through a sieve, discarding the liquid.

Brush a 10 x 15-inch rimmed baking sheet with 2 tablespoons olive oil.  Divide the dough in half and transfer one piece to the baking sheet, leaving the other in the bowl.  Cover both pieces of dough loosely with parchment paper; set aside until plump and airy, about 30 minutes.  Preheat the oven to 450 degrees F.

Spread the dough on the baking sheet so it fills the pan, dimpling it with your fingertips.  Scatter half of the grape-raisin mixture evenly on top.  Put the remaining piece of dough on top and stretch and pat it to cover the bottom piece of dough. (Don’t worry if the dough tears.)  Scatter the walnuts and the remaining grape-raisin mixture on top. dimple the dough all over with your fingertips, poking the topping into the dough.  Cover loosely with parchment and set aside until the dough rises above the sides of the baking sheet by about 1/2-inch, 35 to 40 minutes.

Mix the remaining 1/4 cup sugar, the coriander, rosemary, the remaining 3/4 teaspoon salt and the pepper; sprinkle over the dough.  Place the baking sheet into the oven and bake 10 minutes.  Reduce the oven temperature to 400 degrees F. and bake until the focaccia is golden and springs back when pressed 20 to 30 minutes.  Brush with the remaining 2 tablespoons olive oil; let cool in the pan 15 minutes, then transfer to a rack to cool.  Can be served warm or at room temperature.  Warning:  Be careful not to eat the bread piping hot or you can burn your lips or mouth on a grape.  This came from personal experience. 

Printable Recipe
 

Cast-Iron Skillet Focaccia

February 12th, 2014

Focaccia in a Skillet 1


Whether you make your own pizza dough or get a store-bought round of dough, there is nothing easier than this focaccia.  With a simple topping of red onion shards, olive oil, rosemary and Parmesan cheese, you can have a special bread on the table in no time.  It is also adaptable.  With ingredients like pizza sauce, mozzarella and pepperoni you could turn it into a deep-dish pizza.

Focaccia in a Skillet 2
I bought a round of multi-grain pizza dough from Publix.   The cast iron skillet is preheated in the oven before adding the dough so that it develops a nice brown crust on the bottom.  We will be making this again with variations.

We are in North Carolina until Saturday.  A snow and ice storm is heading our way.  Hopefully we will not lose power.  Happy Valentine’s Day everyone.  Perhaps you could serve this special bread with whatever special meal you are planning.

CAST-IRON SKILLET FOCACCIA (Recipe adapted from Jamie Deen)

One 1-pound package store-bought pizza dough
All-purpose flour for dusting
3 tablespoons olive oil
1/4 cup red onion, thinly sliced
2 teaspoons chopped fresh rosemary
2 tablespoons freshly grated Parmesan cheese
Kosher salt and freshly ground black pepper

Preheat the oven to 350 degrees F.  Place a 12-inch cast-iron skillet on the center rack as it preheats.  Bring the pizza dough to room temperature.

Dust the counter-surface with flour.  Stretch out the dough to a 12-inch circle.  I rolled it with a rolling pin dipped in flour.  Drizzle the hot skillet lightly with just 1 tablespoon of oil.  Lift up the skillet by the handle and swirl to coat the bottom of the pan completely.

Add the dough to the hot skillet and carefully stretch it to go halfway up the sides.  Press your fingers into the dough to make small indents.  Sprinkle with the remaining 2 tablespoons olive oil, the red onions and rosemary.  Top with the freshly grated Parmesan.

Bake on the middle rack until lightly golden brown, about 35 minutes.  Slice into wedges and serve.

Printable recipe

Why are These People Smiling?

August 15th, 2011

They are smiling in anticipation of one of the best meals they will ever eat.  David and I were invited for dinner at my dear friend and blogging buddy Penny’s home near Asheville.  Her blog, The Comforts of Home embodies all that the name implies.  She and her husband have been creatively turning the home they bought a few years ago into the place we would all like to call home.  You need to visit her blog to appreciate all that they have done.

Penny greeted us at the door with “Hola”.  I knew immediately that we were in for a Spanish inspired meal.  It was a visual delight after entering their beautiful home.  Penny and Mr. Comforts of Home have been working on their backyard to create a French inspired potager and pergola with a fountain and warming firepit area.  The table was so inviting that I had no doubt that we were in for a treat.

The meal began with Manchego cheese, Marcona almonds, Spanish olives and flat bread.  With it we had a cooling gazpacho made from tomatoes from Penny’s garden.

We garnished it with croutons, hard boiled eggs and fresh tomatoes.

Mr. Comforts of Home cooked the paella on the grill in a huge paella pan.  The ingredients were added to the pan in stages.

First the chorizo was sauteed in oil.

Then a sofrito (including onions, garlic, tomatoes and red bell peppers) was sauteed in the pan.

Rice, chicken broth and saffron were then added and it was left to cook.

The seafood was nestled into the rice and cooked briefly.

When the seafood was cooked the sliced chorizo was added back to the pan along with peas and lemon wedges.  As the rice cooked it formed a crust on the bottom called a soccarat.  It was time to dig in.

My plate was a masterpiece of vivid color.  The Spanish wine was a perfect accompaniment to the food.  We were then treated to a Spanish inspired dessert of crema catalana.

 
Crema Catalana is similar to Creme Brulee’ but is softer in texture and has a lovely flavor of cinnamon, vanilla, and essence of orange and lemon.  The carmalized sugar on top was curtesy of Mr. Comforts of Home’s blow torch.  The chef’s torch that Penny had was not working properly so Mr. C did the manly thing and used a tool with power.  Never be afraid to use your power tools while cooking.

Please go over to Penny’s blog to read her take on our lovely meal and get the recipes for gazpacho and crema catalana.  Here is her recipe for Paella.

PENNY’S PAELLA

 1/4 Cup Olive Oil
2 Spanish Chorizo Sausages
2 Garlic Cloves, Minced
1/2 Spanish Onion, Diced
1 Red Bell Pepper, Diced
2 Ripe Tomatoes, peeled, seeded and finely chopped

2 Cups short to medium grained rice (I used Risotto)
1 Teaspoon Spanish Paprika
1/2 Teaspoon Dried Rosemary
1/2 Teaspoon Dried Thyme
1/4 Teaspoon Ground Cumin
Salt and Pepper To Taste

2 Teaspoons Saffron Threads

6 Cups Warm Chicken Stock

2 Lobster Tails, Split
1 Pound Shrimp
1 Dozen Mussels
1 large filet, white flaky fish like Haddock Cut Into 2 inche pieces

1/2 Frozen Sweet Peas, Thawed
Lemon Wedges

Heat oil in paella pan over medium high grill. Add chorizo and cook until done. Then remove from pan, cut into slices and set aside.
Saute garlic, onios, tomatoes and peppers until carmelized. Stir in seasonings.

Steep saffron in 1/4 cup hot water for 5 minutes. Add rice to pan, stirring to coat. Stir in saffron/water.

Add stock and simmer for 10 minutes, gently moving the panaround so the rice cooks and absorbs evenly – do not stir constantly!

Add sausage back into pan. Add lobster, wait 2 minutes, add shrimp, wait two minutes, add white fish, wait two minutes then add the mussels. Simmer without stirring until rice is al dente and the mussels have opened.

Scatter peas across top and continue to cook until liquid is absorbed and a crust (socarrat) had formed on the bottom.

Let rest 5 mintues off heat. Add lemon wedges and serve.
 
If you would like to make a paella and don’t have a paella pan, La Tienda is a good source for all kinds of Spanish cookware.
 
 
Printable recipe
 

© Penny Klett, Lake Lure Cottage Kitchen. All rights reserved.