Dinner with New Friends

April 26th, 2012

I don’t often mention it but we have a rental cottage on our property.  When we decided to add a second story to the cottage we knew that we would need a place to live for an extended period of time.  We first had our contractor build a garage for us with an apartment above it.  David and I lived there for two years while the cottage was reconstructed.   We now rent it out on a short term basis from April to the end of October.  I have a link for it on my side bar.

Last year we had a great couple from Iowa staying there for a week while they looked for a place of their own in the Lake Lure area.  They have found a piece of property and are building a log cabin.  You can imagine that supervising a construction from Iowa is not an easy task.  They are back staying in our guest cottage this week.

We have had a dilemma.  We will be on our trip to France for three weeks in June.  I hate to board our dog Daisy for that length of time.  Plus, who would look after our rentals?  Light Bulb Moment!  Tom and Diana need to be here as much as possible and they need a place to stay.  They have agreed to stay in our cottage, manage the guest cottage rentals, take care of our dog and supervise the construction of their own cabin.  They have a dog named Lucy.  Lucy and Daisy like each other.  Perfect solution.

We invited them to dinner Tuesday night to discuss the logistics.  We enjoy their company and look forward to them moving here when their cabin is finished.  But in the meantime, our minds are at ease about being gone for such a long time.

Dinner was Beef Bourguignon, mashed potatoes, Provencal green beans, yeast rolls and this Apple Crostata from Ina Garten.  You can almost never go wrong with one of the Barefoot Contessa’s recipes.  The recipe in Barefoot Contessa Parties!  calls for doubling the pastry amount so that you can tuck one in the freezer for a future crostata.  Guess you know what you are having for dessert Saturday night Penny and K.  Yes, my blogging buddy Penny of The Comforts of Home and hubby will be here for dinner then.

APPLE CROSTATA

FOR THE PASTRY  (2 Tarts)

2 cups all purpose flour
1/4 cup granulated or superfine sugar
1/2 teaspoon kosher salt
1/2 pound very cold unsalted butter, diced
1/4 cup ice water

FOR THE FILLING ( 1 Tart )

1 1/2 pounds McIntosh, Macoun, or Empire apples
1/4 teaspoon grated orange zest
1/4 cup all purpose flour
1/4 cup granulated or superfine sugar
1/4 teaspoon kosher salt
1/4 teaspoon ground cinnamon
1/8 teaspoon ground allspice
4 tablespoons cold unsalted butter (1/2 stick), diced

For the pastry, place the flour, sugar, and salt in the bowl of a food processor fitted with a steel blade.  Pulse a few times to combine.  Add the butter and toss quickly with your fingers to coat each cube of butter with the flour.  Pulse 12 to 15 times, or until the butter is the size of peas.  With the motor running, add the 1/4 cup of ice water all at once through the feed tube.  Keep hitting the pulse button to combine, but stop the machine just before the dough comes together.  Turn the dough out onto a well-floured board and form into 2 disks.  Wrap with plastic and refrigerate one of the disks for at least an hour.  Freeze the rest of the pastry.

Preheat the oven to 450 degrees F.

Roll the pastry into an 11-inch circle on a lightly floured surface.  Transfer it to a baking sheet lined with parchment paper.

For the filling, peel., core and quarter the apples.  Cut each quarter into 3 chunks.  Toss the chunks with the orange zest.  Cover the tart dough with the apple chunks, leaving a 1 1/2-inch border.

Combine the flour, sugar, salt, cinnamon, and allspice in the bowl of a food processor fitted with a steel blade.  Add the butter and pulse until the mixture is crumbly.  Pour into a bowl and rub it with your fingers until it starts holding together.  Sprinkle evenly on the apples.  Gently fold the border over the apples, pleating it to make a circle.

Bake the crostata for 20 to 25 minutes, or until the crust is golden and the apples are tender.  Let the tart cool for 5 minutes, then use 2 large spatulas to transfer it to a wire rack.

Printable recipe

Magic Bars

February 11th, 2012

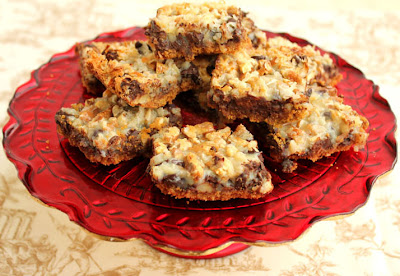
This was a hit with the Hubs.  “What have you made ?”  he said, tasting.  “Holy sh#*t  Moly, these are good.”   What about the diet?”  ” Not to worry”, I said.  “These are for friends, not us”.  Weeping sounds.  “OK, maybe you can have just one more”, I replied.

I have to admit that these Magic Bars are something special.  The recipe has been around for a long time, but I had never heard about them before.  Last Christmas David bought me a cookbook at the suggestion of one of my OBFFC (Oldest Best Friend From Childhood).  Thanks Lyla!  She suggested the Neiman Marcus Cookbook and it has some terrific recipes in it.

The Magic Bars are nothing more than a layer of buttered graham cracker crumbs, chocolate chips, shredded coconut and nuts.  A can of sweetened condensed milk is drizzled over the top and they are baked until the chocolate is oozy and the crust is browned.

We are going out to dinner with a group of friends Sunday night to celebrate and they will each get a box of goodies.  Happy Valentine’s Day.

MAGIC BARS (Adapted from The Neiman Marcus Cookbook)

1 1/2 cups graham cracker crumbs
1/2 cup (1 stick) butter
1 14 ounce can sweetened condensed milk
2 cups chocolate chips
1 1/2 cups coconut
1 cup chopped pecans, walnuts or peanuts

Preheat oven to 350 F (325 F if using glass pan)

Melt butter and mix with graham cracker crumbs.  Pat mixture into a greased 13×9-inch baking dish.

Sprinkle chocolate chips over crust, then coconut, then nuts.  Pour the condensed milk evenly over pan.

Bake for 25 minutes or until lightly browned.  Let cool before cutting.

Store in fridge, or cut into pieces and freeze.

Printable recipe

Orange and Olive Oil Cake

January 10th, 2012

I have a list of Pins on Pinterest that I would love to get through this year.  If you haven’t been to that website you really should give it a look.  The whole idea is that you can create pin boards of images that you have seen on the web and go back to your pin boards anytime that you would like.  I have pin boards for home design ideas, Holiday ideas and of course Recipes to Try.  This recipe appeared on Pinterest not too long ago and the idea of a refreshing orange studded cake (or sweet bread) really appealed to me.  The use of olive oil instead of butter sounded like a healthy alternative also.

The original recipe came from Smitten Kitchen.  Deb used blood oranges in the recipe.  The recipe that appeared on Pinterest came from Small Kitchen College started by the gals at Big Girls Small Kitchen fame.  I adapted the recipe from their recipe.  But the concept is simple and delicious.  The batter is flavored with orange zest, orange juice and orange chunks.  The fat is olive oil instead of butter.  I was lucky enough to have some leftover O Olive Oil Blood Orange oil to use from the contest I was in recently.  By the way, I did not win in case you are wondering.  The recipe calls for 2/3 cups of olive oil.  I had about 1/3 cup of the flavored oil and used 1/3 cup of regular olive oil.

The cake was moist and delicious with an appealing orange flavor.  You can serve it as is for breakfast or topped with fruit and whipped cream for dessert.  I had it mixed up and in the oven before I walked the dog this morning  What a treat is was to come home to the lovely smells emanating from my oven.

One Pin off of my list!  I would do better if I didn’t keep finding more pins to add. 

ORANGE AND OLIVE OIL CAKE

Butter for greasing pan
2 oranges
1 cup sugar
1/2 cup plain yogurt ( I used sour cream )
3 large eggs
2/3 cup extra virgin olive oil
1 3/4 cups all-purpose flour
1 1/2 teaspoon baking powder
1/4 teaspoon baking soda
1/4 teaspoon salt

Preheat oven to 350 degrees F. and grease a loaf pan.

In a large bowl, add the zest of 2 oranges, sugar, eggs, yogurt or sour cream and olive oil.  Squeeze in the juice of 1 orange.  Cut another peeled orange into 1/4 inch cubes and add to the bowl.  Mix well.  In another bowl, mix together the flour, baking powder, baking soda and salt.

Add the wet and dry ingredients together and stir well.  Pour the batter into the greased pan.  Bake for approx. 50 minutes or until a toothpick comes out clean.

Printable recipe

Onion and Bacon Tart

December 5th, 2011

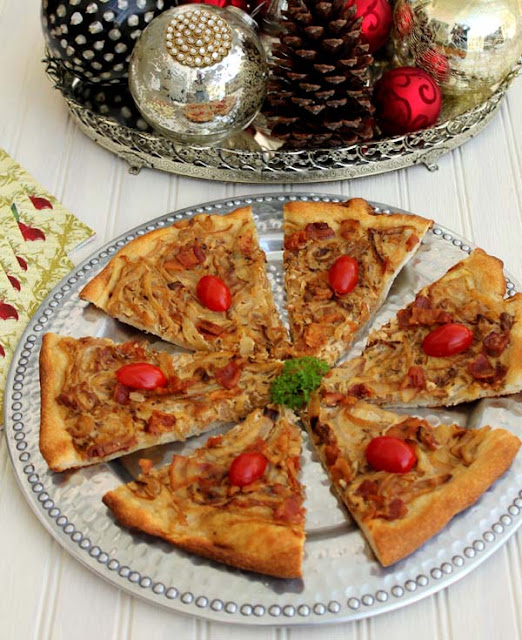
This is a recipe that has been in my folder for a long time.  Unfortunately I did not write down the source.  I have found that it is a great recipe for a simple supper after Christmas shopping or on an appetizer table for the holidays.  You can make your own pizza crust or if you need one quickly, you can buy one of the crusts in a tube.
I love the sauteed onions and bacon on it.  Instead of a tomato sauce and cheeses it has a custard made from sour cream and an egg.  It is subtly seasoned with nutmeg and caraway seeds.  Perfect for this time of year.

ONION AND BACON TART

8 slices Bacon, Chopped
5 cups onions, sliced
1 large egg
1/2 cup sour cream
1/2 tsp salt
1/2 tsp pepper
1/8 tsp nutmeg
1 13.8 ounce tube refrig. pizza dough or your own home made pizza dough
1/4 teaspoon caraway seeds

Preheat oven to 375 degrees. F.  Saute bacon in heavy large skillet over medium-high heat until crisp.  Remove to paper towels to drain.  Remove all but 1 tablespoon bacon drippings from skillet.  Add onions and saute over medium heat until onions are very tender, about 20 minutes.  Cool.

Whisk egg, sour cream, salt, pepper, and nutmeg in large bowl to blend.  Stir in cooled onion mixture and most of bacon.

Roll pizza dough out on lightly floured surface to 13 x 10 inch rectangle or into a circle to fit pizza pan.  Transfer dough to baking sheet.  Spread onion mixture over dough, leaving 1/2 inch plain border around edges.  Add remaining bacon and sprinkle with carasay seeds.

Bake tart until onion custard is set and crust is golden brown around edges and brown on bottom, about 25 minutes.

There is still time to vote in the eRecipeCards contest.  I am currently in 3rd place and I could really use your vote.  Just go over to the website and register.  Then go to the home page and follow the links to the O Olive Oil Contest.  Thanks everybody.

Printable Recipe

Chocolate Salami

October 24th, 2011

I blogged about something similar to this when I was a new blogger.  Here is the link.  I think my photography skills have improved since then.  The recipe has improved too.  Although I liked the original recipe, it was a pain to make the candied citrus rinds.  It made what should have been a quick and easy chocolate confection too time consuming.

Food 52 is having a contest for your favorite Christmas confection.  I immediately thought of this Italian goodie.  The chocolate log is filled with whole almonds, cookie crumbs, dried cranberries and my addition of orange zest and crystallized ginger.  When it is sliced it looks like a salami with it’s marbling of fat.

The chocolate and butter are melted in a double boiler.  The almonds, orange zest, soaked cranberries, cookie crumbs and ginger are added.  It is left to cool and then rolled into a log and refrigerated to harden.  It is easy to slice and serve.  I would love to receive a Christmas tin with this treat inside.  The chocolate is enhanced by the additions and the crystallized ginger gives it an extra pop of flavor.  I think it is worth entering in the contest.

CHOCOLATE SALAMI

9 ounces good quality bittersweet chocolate, chopped
3 tablespoons butter
1/3 cup sugar
1/3 cup whole almonds
zest of one orange
1/3 cup dried cranberries soaked in 1/4 cup water and 2 tbls of Triple Sec for 15 minutes and then drained.
1 cup butter wafer cookie crumbs
1/4 cup crystallized ginger slices, chopped
2 egg yolks, beaten

Melt chocolate and butter in the top of a double boiler over simmering water.  When melted add the sugar, almonds, orange zest, drained cranberries, cookie crumbs and crystallized ginger.  Stir and remove from heat.  Cool for a few minutes.  Add the beaten egg yolks and allow to come to room temperature.  Form chocolate mixture into a log,  Smooth the surface to be sure none of the filling is sticking out.  Wrap the log in wax paper and refrigerate until firm.  Take out of fridge and leave at room tempeature for 30 minutes.  Slice and serve.  Chocolate log can be frozen for later use.

Printable recipe

© Penny Klett, Lake Lure Cottage Kitchen. All rights reserved.