Tomato and Goat Cheese Tarts


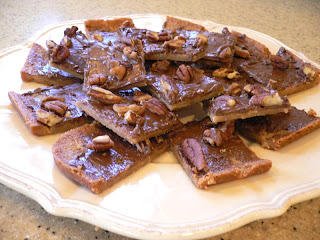
 I am seriously addicted to these cookies. The recipe came from a co-worker whose Mother ran a gourmet cooking store and school. I have no idea where the name originated and, as a matter of fact the name on the recipe was Scandinavian Tea Cake. This made no sense to me because a Scandinavian tea cake is usually a yeasty concoction and these cookies are buttery and crisp. So I have officially renamed the recipe.
They are very easy to assemble and use very few ingredients. The only difficult part of the recipe is grating the chocolate bars and I have simplified that by using chocolate chips. Now if you are a chocolate purist, you could use a high quality milk chocolate bar and they would be even better. One day when I have better gourmet choices at the grocery store I will use a fine quality chocolate. In the past I have used 6 Hershey’s Milk Chocolate bars, but they were difficult to grate and I had to keep returning them to the fridge to harden enough to take the grate. This time I used Nestle’s Milk Chocolate Chips and they melted and spread very easily. It is hard to go wrong with this recipe. And wouldn’t they be excellent for tea with my Chicken Almond Tea Sandwiches?
SCANDINAVIAN TEA COOKIES
1 cup butter, softened
1 cup brown sugar
1 egg yolk
1 cup unbleached flour
6 (1.05 oz.) milk chocolate bars, grated ( I used 7 oz. milk chocolate chips)
2/3 cup chopped pecans
Preheat oven to 350 degrees
In a medium mixing bowl, cream butter, sugar, and egg yolk until very smooth. Gradually add flour until well blended. Spread dough on lightly greased 15 1/2″x10 1/2″x 1″ sheet pan. Bake for 15 to 20 minutes until medium brown. Sprinkle chocolate shavings or chips evenly over cake. Put in oven to melt and when warmed remove from oven and spread over top. Sprinkle with nuts. Cut into squares when cool.

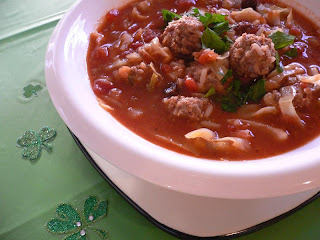
Happy St. Patrick’s Day everyone. In honor of the occasion I have made my friend Maxine’s cabbage roll soup. This is not a typical St. Patrick’s day dish by any means. As a matter of fact it’s origins are in Eastern Europe I am sure. But cabbage is associated with St. Patrick’s Day, so it seemed fitting that it could be served to celebrate this day.
Our Mothers and Grandmothers made cabbage rolls – at least mine did. About ten years ago I asked my Mother to show me how she made her cabbage rolls and we spent a memorable afternoon boiling and rolling cabbage around ground beef and rice. The rolling had to be just so, with the edges tucked and sealed before being placed in the pot atop shredded cabbage to protect the leaves from burning. My Mother’s hands were as deft and sure as mine were clumsy and hesitant. And I learned more than making cabbage rolls that day.
Maxine’s Grandmother also made cabbage rolls. Over the years she has adapted the recipe into a soup using the same ingredients that her Grandmother used, but simplifying the process. The first time I tried this soup I loved it. It has delicious meatballs in a fragrant and flavorfull cabbage soup, accented with raisins and a sweet and lemony taste. Maxine, thank you for sharing your recipe with us.
MAXINE’S CABBAGE ROLL SOUP
For the Soup:
1 head of cabbage, shredded
1 large onion
2 garlic cloves, minced
1 28 oz. can diced tomatoes
1 15 oz. can tomato sauce
1/2 cup brown sugar
1/3 cup lemon juice
1/2 cup raisins
5 cups water
For the Meatballs:
1 pound ground chuck or round
2 tablespoons grated onion
2 tablespoons water
1 teaspoon salt
1/4 teaspoon pepper
1 egg
1/2 cup uncooked rice
1/2 cup bread crumbs
In large dutch oven saute onions and garlic in small amount of olive oil till soft. Add salt and pepper. Add shredded cabbage and lightly saute till soft. Add tomatoes with their liquid, tomato sauce, brown sugar, lemon juice, raisins and 5 cups water. Stir to blend.
Mix all meatball ingredients. Form cocktail size meatballs from mixture and add to liquid. Bring to a boil. Cover and cook on low for about 1 to 1 1/2 hours. Enjoy. Serves 4 to 6.

I am always on a quest for new ideas for pastry crust. Pies, both savory and sweet are a permanent part of my memory bank and producing a perfectly flaky crust is to me the equivalent of nirvana. I am also drawn to all things French and when I found this cookbook at a bargain price, I knew that I would be sampling many of the recipes within.

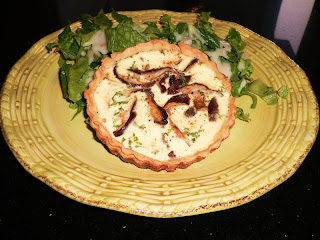
I have posted one recipe from this book already. It was Salame di Cioccolata. Many of the recipes are sweet confections, but there is also a section on quiches. I was intrigued by the savory shortcrust pastry which has a ratio of butter to flour of 1/2 and also includes an egg. Also the pastry was done completely in a food processor. The quiche filling is similar to ones I have used before and I loved the idea of using mushrooms to enhance the flavor. The pastry was easy to handle and considering that I had to use it to line six small quiche pans, it was forgiving of the cutting, lifting, and patting into place. The finished quiches lifted easily from the pans and held their shape when placed on the serving plate. They were good, very good. The filling was savory and with the mushrooms, very earthy. I am still searching for the perfect crust though . . . the flakiness was not quite there.
I served the quiches over a simply dressed green salad. I love individual quiches and there are so many ways you can use them. They would make a perfect first course with dressed baby greens, for brunch with fruit and sweet rolls, for lunch on the run, or packed in a picnic basket with a chilled bottle of pinot grigio and chocolate truffles. Enough already. . . I am making myself hungry.
WILD MUSHROOM QUICHE – From Artisan Patisserie for the Home Baker by Danya Weiner
Savory Shortcrust Pastry:
1/2 cup cold butter
1/2 tsp salt
1 egg
1 Tbls cold water
1 1/4 cups unbleached all purpose flour
Place the butter and salt in the bowl of a food processor and process 2 minutes until thoroughly combined. Stop the processor and add the egg, water, and half the flour. Continue to process 2 minutes, until the dough is smooth and uniform. Stop the processor again, add the remaining flour, and continue to process 1 minute until a neat ball is formed. Remove the dough from the bowl and cover with plastic wrap. Let rest in the refrigerator for at least 1/2 hour before using.
Basic Quiche Filling:
3 eggs
1 1/4 cups heavy cream
1 tsp salt
1/2 tsp freshly grated nutmeg
Combine the eggs and heavy cream in a bowl and mix gently. Whisk in the salt and nutmeg till smooth. Use immediately or transfer to a covered container and refrigerate for up to 2 days.
Wild Mushroom Quiche:
1 recipe Savory shortcrust Pastry
1 egg. beaten
1/2 cup butter ( I used only 3 Tablespoons)
4 garlic cloves, minced
3 cups assorted wild mushrooms ( I used Shitakes)
1 tsp salt
1 tsp white pepper
2 Tbls finely chopped parsley
1/4 cup freshly grated Parmesan cheese
1 recipe Basic Quiche Filling
1. Roll out the shortcrust pastry 1/8 inch thick on a lightly floured work surface.
2. Divide the dough evenly among six 4-inch quiche pans, using your fingers to press the dough into place. Cut off any excess dough around the edges.
3. Place the pans in the refrigerator for 15 minutes. In the meantime, preheat the oven to 375 degrees.
4. Cut out pieces of parchment paper to fit the bottom of the pans. Place the paper over the chilled dough and weigh down with beans or commercial pie weights. Bake for 20 minutes.
5. Remove the weights and a paper, and brush the bottoms and sides with the egg. Bake for an additional 3 minutes. Transfer the pans to a work surface.
6. Heat a heavy frying pan over medium heat and add a tablespoon of butter. Add the garlic and saute for 1 minute till softened.
7. Add the mushrooms, salt, and pepper and saute for 10 minutes. stirring often, until the mushrooms are softened and aromatic. Add the remaining butter ( 2 tablespoons) and cook for an additional 3 minutes. Now add the parsley and stir.
8. Drain the mushrooms and divide equally among the pans. Sprinkle the cheese and pour the prepared filling on top. Return the pans to the oven and bake for 20 minutes. Serve immediately or let cool to room temperature and reheat before serving. Also good at room temperature.

2 extra-large eggs
1 1/2 cups seasoned dried bread crumbs
Good olive oil
3 tablespoons unsalted butter, at room temperature
1/3 cup freshly squeezed lemon juice (2 lemons) lemon halves reserved
1/2 cup dry white wine
sliced lemon, fo serving
chopped fresh flat-leaf parsley, for serving
Preheat the oven to 400 degrees. Line a sheet pan with parchment paper.
Place each chicken breast between 2 sheets of parchment paper or plastic wrap and pound it out to 1/4 inch thick. Sprinkle both sides with salt and pepper.
Mix the flour, 1 teaspoon salt, and 1/2 teaspoon pepper on a shallow plate. In a second plate, beat the eggs and 1 tablespoon water together. Place the bread crumbs on a third plate. Dip each chicken breast first in the flour, shake off the excess, and then dip in the egg and bread-crumb mixtures.
Heat 2 tablespoon olive oil in a large saute pan over medium to medium-low heat. Add 2 chicken breasts and cook for 2 minutes on each side, until browned. Place them on the sheet pan while you cook the rest of the chicken. Heat more olive oil in the saute pan and cook the second 2 chicken breasts. Place them on the same sheet pan and allow them to bake for 5 to 10 minutes while you make the sauce.
For the sauce, wipe out the saute pan with a dry paper towel. On medium heat, melt 1 tablespoon of the butter and then add the lemon juice, white wine, the reserved lemon halves, 1/2 teaspoon salt, and 1/4 teaspoon pepper. Boil over high heat until reduced by half, about 2 minutes. Off the heat, add the remaining 2 tablespoons of butter and swirl to combine. Discard the lemon halves. Serve one chicken breast on each plate, spoon on the sauce, and serve with sliced lemon and a sprinkling of fresh parsley.
