Ratatouille From our French Friends

July 27th, 2011

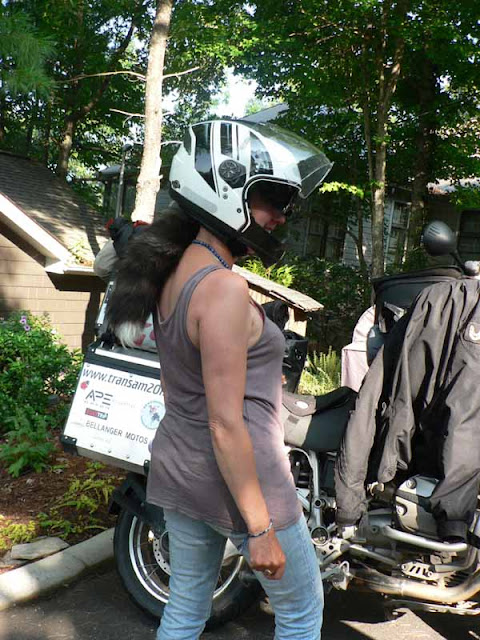
While on our motorcycle trip to Alaska and the Pacific Northwest we met Carole and Laurent on the ferry trip down the Inner Passage toward Vancouver Island.  We thought we were brave souls for making the trip to Alaska, but Carole and Laurent have us beat by miles.  They have taken a year off from their jobs, shipped their bike to Montreal, ridden across Canada, toured Alaska and now have ridden from West to East across the United States.  We invited them to stay with us on their trip South.  They are on their way to Florida to stay for a few weeks and then will head west again through Texas, into Mexico and Central America.  They will then load their bike on a boat to South America and spend the remainder of their trip exploring that continent.  Not only do they have all of their clothing for all kinds of weather, camping gear and supplies with them, but they travel with panache.  Carole always wears her pearls and her hair is cut in a short style that defies the evil effects of helmet head.  They have a blog which chronicles the trip and Carole has a separate section “just for girls” that tells you how to travel with very little and still look good.

Carole’s silver fox helmet attachement is tres chic.  As is her recipe for ratatouille.

Ratatouille has it’s origins in Provence and uses a melange of summer vegetables.  Eggplant (Aubergine), zuchinni (corgettes), peppers, onions and tomatoes.  Carole and Laurent live in Tours which is in the heart of the Loire River Valley.  They have invited us to stay with them when we visit France next summer.  Carole’s version of ratatouille differs from the recipes I have seen before only in the seasonings.  Most ratatouilles are seasoned with thyme and bay leaves.  Carole uses cumin and cilantro.  That is “so individually Carole” and so good.  Here is her recipe.

RATATOUILLE

1 eggplant cut into small cubes
1 onion, chopped
3 zuchinnis cut into small cubes
1 sweet red pepper, chopped
3 garlic cloves, minced
1 bunch of cilantro, chopped
1 tsp cumin powder (or to taste)
Salt and pepper to taste
1 28 ounce can diced tomatoes
Olive oil for sauteing

In a large skillet coated with olive oil saute the eggplant and onions until they are soft.  Remove from pan to a bowl.  Add more oil to pan and in it saute the zuchinni and and red pepper until they are soft.  Add the garlic to the pan and cook for 1 more minute.  Add the cumin and the cilantro.  Stir.  Return the eggplant mixture to the pan along with the can of diced tomatoes.  Salt and pepper to taste.  Bring to a boil and then lower the heat to simmer and cover.  Cook over low heat for about 45 minutes.  Serve as is or over rice.

Dinner was delicieux, tres magnifiques.

We said our au revoirs this morning.  We hated to see them leave.

Rendez-vous l’annee prochaine.  See you next year.  Bon Voyage Carole and Laurent!  You can follow their blog and adventures here.

Printable recipe

Chicken Cutlets with Balsamic Vinegar and Honey Glaze

July 23rd, 2011

Using thin sliced chicken breasts is an easy way to get dinner on the table in a hurry on those days when  you have too much going on.  We are finishing the downstairs area of the cottage.

The lower level of the cottage has a sitting area and the guest bedrooms.  The sitting area is an awkward shape because it is part of the original cottage and we had to add a stairwell to the upper floor which is all new.

This was my problem corner.  Originally I wanted to put a chair and a half sleeper here but there just wasn’t room.  I finally found a comfortable leather chair and ottoman that fits the space perfectly.  Across from this is a flat screen TV and a “future”  TV console table.   I am still looking.  I love the pictures of our Granddaughter above the chair.

This gives you more of a perspective on where the stairs changed the shape of the sitting area.  The french doors lead to the sleeping porch.

So, I have been shopping this week and have had little time to spend in the kitchen.  The chicken recipe is a very loose adaptation of one that appeared in Gourmet years ago.  There is a lot of flavor in this dish even though it goes together quickly.  The wine, garlic, balsamic vinegar and honey are reduced to a glaze which is drizzled over the breaded chicken cutlets.  David went back for seconds.

CHICKEN CUTLETS WITH BALSAMIC VINEGAR AND HONEY GLAZE

3 tablespoons balsamic vinegar
2 teaspoons honey
4 thin sliced chicken cutlets
3/4 cup breadcrumbs (I used half Panko crumbs and half whole wheat dried bread crumbs)
Salt and pepper to taste
1 egg, beaten and thinned with a little water
1/4 cup olive oil
2 cloves of garlic, minced
1 tablespoon unsalted butter
1/4 cup white wine
Parsley for garnish

Mix the balsamic vinegar with the honey in a small bowl.  Set aside.  Dip the chicken cutlets into the egg wash and then into the seasoned breadcrumb mixture to coat.  Heat the oil in a large skillet.  Fry the chicken cutlets in two batches until they are browned on each side and cooked through.  Remove to a platter.  Wipe out the skillet and add the butter.  Cook the garlic in the butter for about 1 minute.  Stir in the wine and boil the mixture until the liquid is reduced to about 2 tablespoons.  Stir in the reserved vinegar mixture and boil the mixture until it is syrupy.  Spoon the glaze over the chicken and sprinkle with parsley.  Serves 2.

Printable recipe

Grilled Flank Steak Sandwich with Sweet Onion Marmalade and Pear Horseradish Mustard

July 19th, 2011

This has got to be one of the best sandwiches I have ever made.  It may become my signature sandwich, if there is such a thing.  It all started when I was contemplating entering a contest at one of my new favorite  websites, Food52.  The contest this week is “Your best flank steak”.  I was looking to do a little something different than just grill a marinated flank steak, but decided that could be my jumping off point.  I love onions and have been making a red onion marmalade to accompany my pork tenderloin for years.  For the sandwich I decided to do sliced sweet Vidalia onions and cooked them with sugar and vinegar to give them a sweet and sour taste.  In an old Gourmet magazine there was a recipe for a pear and horseradish mustard that has always intrigued me.  I fiddled with the recipe, changed some of the ingredients and finally got a condiment that is way better than either mustard or mayonnaise.  It has a little kick from the horseradish and sweetness from the pears, steeped in cinnamon, bay and peppercorns.  Wow!

With ingredients this good, I needed a bread that would compliment the flavors but not overpower them.  I love ciabatta rolls.  They have a great texture and a mild taste.  I browned the split ciabatta rolls in a little olive oil in a large skillet and they had a nice crunch to them.  They were just perfect for the melting steak slices and sauteed onions.  But the star of this show is the pear horseradish mustard.  It makes a lot and keeps in the refrigerator for up to a month.  So you can enjoy it on many different sandwiches.  As for me, I think I will be grilling a lot of flank steaks.

Comments on the entries in the contest are important.  I would appreciate it if you would comment on my entry.  Just go to Food52 and tell me what you think.  Thank you!

GRILLED FLANK STEAK SANDWICH WITH SWEET ONION MARMALADE AND PEAR HORSERADISH MUSTARD

Serves 4

For the Flank Steak and Sweet Onion Marmalade:

1 Flank Steak, 1 1/2 to 2 lbs
5 tablespoons Worcestershire sauce
5 tablespoons Ketchup
5 teaspoons Brown sugar
1/2 cup Red Wine

2 Large Vidalia onions, halved and sliced
3 tablespoons Canola oil
3 tablespoons Sugar
3 tablespoons Red Wine Vinegar
1/4 cup Water

1.Marinate the flank steak in the Worcestershire, ketchup, brown sugar and red wine in the refrigerator for at least 2 hours or overnight. 

2.While steak is marinating, heat the 3 tablespoons of oil in a large skillet. Add the sliced onions and cook over moderate heat until the onions become soft. Add the sugar and cook stirring for a few minutes. Add the vinegar and turn the heat to low and cook until almost all of the liquid has evaporated. Add the water and simmer, stirring, until mixture is slightly thickened and onions are very tender, about 10 minutes. 

3.Prepare grill. Remove steak from marinade and grill it over hot coals turning once until it reaches your desired doneness. Medium rare to medium works best. Remove steak and let rest before slicing it into thin strips. 

For the Pear Horseradish Mustard and Final Assembly:

4 Ripe Pears, peeled and chopped
1/2 cinnamon stick
1 bay leaf
6 peppercorns
1/4 cup Red Wine Vinegar
1/2 cup Red Wine
1 10 ounce bottle of Grey Poupon Dijon Mustard
2 tablespoons Creamy Horseradish
4 Ciabatta rolls, split and cut side browned in an oiled pan
Chopped lettuce for garnish

1.Wrap the cinnamon stick, bay leaf and peppercorns in a small piece of cheesecloth and tie with kitchen string. Add the chopped pears and cheesecloth bag to a large saucepan with the red wine vinegar and wine. Bring the mixture to a boil and reduce heat to simmer. Cook uncovered for about 20 minutes or until the liquid has reduced. Cool slightly and remove cheesecloth bag. Puree the mixture in a food processor. Add the pear puree to a large bowl along with the Dijon mustard and the horseradish. Stir to combine. The pear horseradish mustard keeps, covered and chilled for 1 month. 

2.Assemble the sandwiches. Spread the split and toasted ciabatta rolls with 1 tablespoon pear horseradish mustard per side (or to taste). Add the sliced steak and the onion marmalade. Garnish with lettuce. Enjoy
 
Printable recipe

Sweet Cherry Pie

July 15th, 2011

Cherry pie has been on my mind lately.  We had a wonderful cherry pie at The Inn on Crippen Creek Farm on our vacation.  My friend Lyla commented on the fact that I failed to get the recipe for it and drats, it is true.  While shopping the other day I picked up some sweet cherries with the intention of baking a pie.  While laboriously pitting the cherries yesterday David said “what are you going to do with them?”  I said “make a pie”.  He said “You can’t make a cherry pie with sweet cherries!”  “What!”  I said.  You have to understand that I trust what he is saying, in this case, because he grew up on a farm.  A fruit farm.  With cherry trees.  His Mom was a great cook.  Their cherries were sour.  Grumbling, I went to the internet and searched for recipes for sweet cherry pie if there were such things.  I found one and it was from Deb at Smitten Kitchen.  If you can’t trust her authority, one who is under contract with Knopf for a cookbook coming out next Spring, who can you trust.  So there.  As I expected when making a cherry pie with sweet cherries, just use less sugar.

I feel pretty confident about pie crust.  Even back in high school when I didn’t know how to cook anything else, I knew how to make a pie.  I had grown up watching my Mom and Grandma make pies.  As a matter of fact when David and I were first dating I decided to impress him with a homemade apple pie.  I worked on it all afternoon taking extra care to flute the edges of the crust just so.  David picked me up for out date and we went to a movie.  Now you have to understand that there were two people in our family who loved pie crust;  my Dad and me.  While we were gone, my Dad started nibbling on the edges of the pie by breaking off small pieces, a little here a little there.  He couldn’t help himself.  By the time we got home, my beautiful pie looked like a family of mice had gnawed their way through the edges leaving crumbs of pastry scattered everywhere.  It was a disaster.  David laughed.  I was furious.  Later my Dad apologized, but it was not as heartfelt as I thought it should have been.  He thought it was the funniest thing that he had ever done and over the years the story was told over and over again with great mirth.

So to this day, when I make a pie, I always make it with a thick crust with the edges fluted just so.  Just for Dad.

For the recipe for sweet cherry pie and a really great all butter pie crust check out Deb’s Smitten Kitchen blog post.

Egg Nest

July 13th, 2011

The last month has been about fun and excess.  Our trip to Alaska, Vancouver Island, Washington and Oregon was everything we could have hoped for.  It was a trip of a lifetime and David has fulfilled his thirty-year-long dream of riding his bike to Alaska and the Arctic Circle.  We are back home.  Life goes on.

Getting back into the kitchen has been something I have relished.  Our small garden is maturing and the peace and quiet of the lake has been a balm to our travel weary souls.  I needed to start out simple just to come down from our sometimes over-indulgent habits.  I went to my farm source and bought a dozen fresh eggs.

While cruising the blogs looking for new egg recipes, I found a blog I did not know.  Imagine that!  Home Cooking in Montana had a recipe for egg nests.  She found the recipe from Elise at Simply Recipes.  What a revelation to me.  Why haven’t I thought of this simple preparation?  To make it even more appealing,  the recipe appeared first in a French children’s cookbook called La Cuisine est un Jeu d’ Enfants or Cooking is Child’s Play.

I have made eggs nestled in bread slices (Toad in a Hole), muffin cups with Prosciutto or hashbrowns, but never thought to nestle an egg yolk into it’s frothy beaten white.  I love this presentation.  To make it even better the egg white can be flavored with cheese and/or herbs.  Give this a try.  You will love it.

EGG NESTS

2 eggs
Salt to taste (1/8 to 1/4 tsp)
1/4 to 1/2 cup grated Gruyere cheese

1. Preheat the oven to 450 degrees F with a rack in the middle.  Line a baking sheet with parchment paper or Silpat.  If using parchment paper grease it lightly.

2. Sepearate the egg yolks from the whites.  Make sure there are no little pieces of egg yolk in the whites or you will have difficulty getting the whites to beat properly.  Place each egg yolk in a seperate small bowl.

3. Place the egg whites in a very clean mixer bowl.  Add the salt and beat the egg whites with a whisk attachment (or hand mixer) until stiff peaks form.

4. Gently fold in the grated Gruyere cheese, taking care not to deflate the egg whites.

5. Create two mounds of the egg white mixture on the lined baking sheet.  Form the mounds so they look like nests, with indentations in the center.

6.  Place in the oven for 3 minutes.  After 3 minutes, open the oven, pull out the pan and gently add an egg yolk to the center of each nest.  Return the baking sheet to the oven and cook for 3 more minutes.  Serve immediately.

Printable recipe

© Penny Klett, Lake Lure Cottage Kitchen. All rights reserved.