Chipotle Maple Barbecue Beef Brisket

March 4th, 2011

I am planning a get together for all of our friends here in Florida before we head back to North Carolina the first of April.  I would like it to be a pool party.  We have a lanai with a pool.  It is lovely to look at, but it is always too cold to use while we are here and that is driving me crazy.  What is the sense of having a pool if you can’t use it?  So I decided to invite people over at the end of the month to gather around the pool on the lanai and have cocktails and a buffet dinner.  I do not expect anyone to swim, but at least we can enjoy the ambiance.

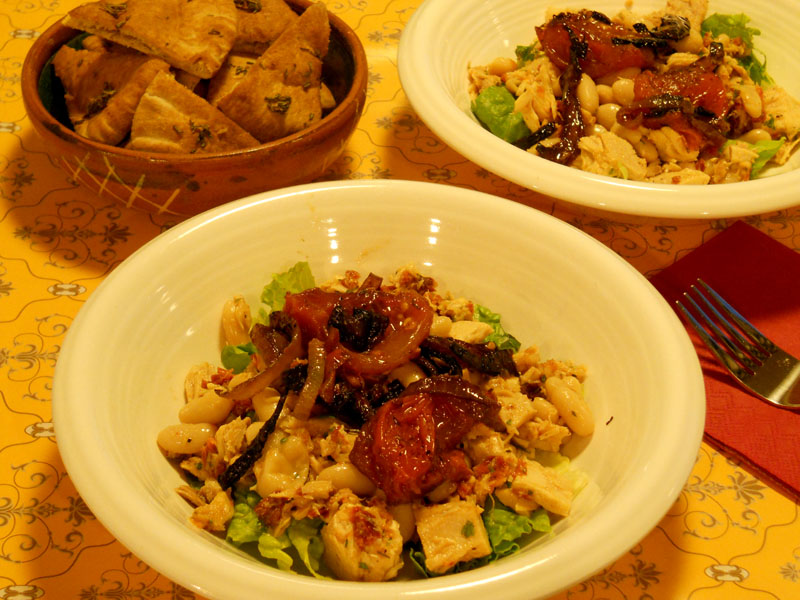
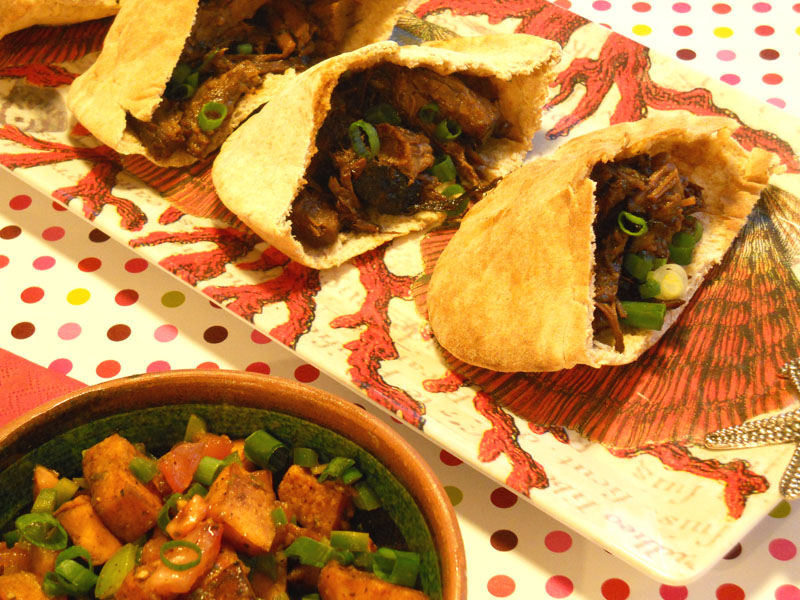
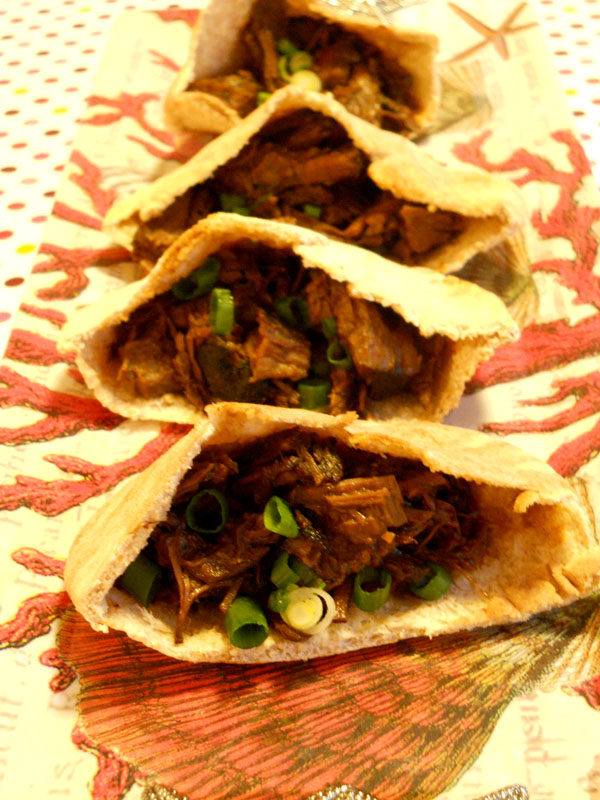
So I am testing recipes.  This first recipe for chipotle maple barbecued beef brisket is very crowd friendly.  There are a few steps involved, but it can all be done ahead of time.  I have found that when a recipe has many components, it increases ithe flavor complexity greatly.  A large beef brisket is first massaged with a dry rub, placed in a marinade and marinated overnight.  Then a barbecue sauce in made with wonderful ingredients like chipotle chilies, maple syrup, apple cider, and crushed tomatoes.  The brisket is briefly charred on the grill and then placed in a large iron skillet or casserole with the sauce, marinade and beer and cooked for three hours in the oven.  At this point, after it has rested, the beef can be shredded and returned to the sauce.  I will do this the day before the party.  It will be served in a chafing dish with slider rolls or warmed tortillas on the side.  I used pita bread for our meal because it was what I had in the pantry.  It will also be accompanied by a delicious sweet potato salsa which I will tell you about in my next post.

CHIPOTLE MAPLE BARBECUE BEEF BRISKET ( recipe from Sarah Foster’s Fresh Every Day)

1 3 1/2 to 4 pound beef brisket, at room temperature
2 tablespoons Quito’s Butt Rub (recipe follows) or store-bought barbecue rub
1/2 cup packed light brown sugar
1/4 cup Worcestershire sauce
2 tablespoons balsamic vinegar
1 cup Chipotle-Maple Barbecue Sauce (recipe follows) or your favorite bottled sauce
1 cup beer

1. Sprinkle the brisket with the butt rub.  Stir the brown sugar, Worcestershire sauce, and vinegar together in a shallow dish; pour over the brisket and turn several times to coat the meat evenly.  Cover and marinate in the refrigerator for at least 6 hours or overnight.  Bring the meat to room temperature before cooking.

2. Preheat the oven to 350 degrees F and prepare a hot fire in a charcoal or gas grill.

3.  Remove the brisket from the marinade and place it over the hot coals to sear until the outside is slightly charred, 4 to 6 minutes per side.

4. Place the seared brisket in a large cast-iron or other overnproof skillet or casserole and pour the marinade over it.  Stir the one cup of barbecue sauce and the beer together and pour over the brisket.  Turn to coat the brisket evenly on all sides.

5. Cover the skillet with aluminum foil or a lid and roast the brisket for 3 to 3 1/2 hours or until it pulls apart easily with a fork.  Remove brisket from sauce, let it rest covered with foil for 15 minutes and then shred with a fork.  Return it to the sauce.  It can be served now or cooled and refrigerated for future use.  Reheat gently over a low heat or warm in the oven.

QUITO’S BUTT RUB

Sarah explains that Quito is a barbecue aficionado from Tennessee who has won many contests on the barbecue circuit.

Makes about 1/2 cup

2 tablespoons paprika
1 tablespoon freshly ground black pepper
1 tablespoon kosher salt
1 tablespoon garlic powder
1 tablespoon chili powder
1 tablespoon packed brown sugar
1/4 teaspoon cayenne pepper

Combine the paprika, black pepper, salt, garlic powder, chili powder, brown sugar, and cayenne in a small jar or an airtight container and shake to mix.  This spice rub will keep in a cool dry place for up to 6 months.

CHIPOTLE MAPLE BARBECUE SAUCE

1 28 ounce can crushed tomatoes
1/2 cup maple syrup
1/2 cup packed light brown sugar
3 chipotle peppers in adobo, diced
1 cup white vinegar
1/4 cupWorcerstershire sauce
1/2 cup apple cider
Juice of 2 lemons
4 cloves of garlic, minced
2 tablespoons Colman’s dry mustard
2 teaspoons sea salt
2 teaspoons freshly ground black pepper

Combine the tomatoes, maple syrup, brown sugar, chipotle peppers, vinegar, Worcestershire, apple cider, lemon juice, garlic, mustard, salt, and pepper in a heavy bottomed saucepan and stir to mix.  Bring the sauce to a boil over medium-high heat.  Reduce the heat and simmer for 30 to 35 minutes, until the sauce is thick and reduced by about one quarter.  This sauce will keep refrigerated in an airtight container, for up to 2 weeks.

Printable recipe

Tuscan Tuna and White Bean Salad with Sun-Dried Tomatoes

March 1st, 2011

What are you cooking, he said?  “Just dinner”,  I said.  “It sure smells good”, he said.  “OK, but don’t get your hopes up, it’s  just a pantry meal”.  This was said by me with perfect assurance. And that was my premise when I planned this meal tonight.  It was so simple to open two cans of tuna and a can of cannellini beans.  The recipe from Sarah Foster looked very staightforward.  But after studying the recipe further, it was much more than those simple pantry items.

There was the 35 minutes required to roast plum tomatoes and red onions with fresh rosemary, olive oil and salt and pepper until they were caramelized and soft.

There was the hour to roast a whole head of garlic with oil and rosemary until it was soft and oozing it’s sweet goodness.

There were the sun-dried tomatoes reconsituted in olive oil, lemons and vinegar and flavored with rosemary and parsley.

The aroma from the oven was heady, but still I cautioned restraint.  This, afterall was nothing special;  just a Tuesday night supper.

I was wrong.  It was wonderful.

TUSCAN TUNA AND WHITE BEAN SALAD WITH SUN-DRIED TOMATOES

3 teaspoons extra-virgin olive oil
Juice of 2 lemons
1 tablespoon red wine vinegar
2 tablespoons chopped fresh flat-leaf parsley leaves
1 teapoon chopped fresh rosemary
1/4 cup sun-dried tomatoes
1 15 1/2-ounce canenllini beans, rinsed and drained
2 6-ounce cans solid white tuna packed in water, drained
10 roasted garlic cloves ( See recipe below)
Sea salt and freshly ground black pepper to taste
4 Balsamic-Roasted Tomatoes (See recipe below)

Whisk the olive oil, lemon juice, vinegar, parsley, and rosemary together in a small bowl.  Add the sun-dried tomatoes and let them marinate in the vinaigrette for 10 to 15 minutes to soften.  Place the beans, tuna, and garlic in a medium bowl.  Add the vinaigrette and sun-dried tomatoes, season with salt and pepper, and toss gently to mix.  Cover and refrigerate to marinate for at least 1 hour or overnight.  Serve at room temperature, with the Balsamic-Roasted Tomatoes on top.

ROASTING GARLIC

1 head of garlic
2 tablespoons olive oil
2 tablespoons chopped fresh rosemary

Preheat the oven to 350 degrees F.

Cut the top off the head of garlic with a serrated knife so that you can see the tips of the individual cloves.  Place the garlic on a sheet of aluminum foil, drizzle with the oil, and rub into all sides of the garlic to coat.  Wrap the head of garlic tightly in foil and place in the oven to roast for 50 to 60 minutes, until it is soft to the squeeze.

Unwrap the garlic and allow it to cool.  When the garlic is cool enough to touch, squeeze the soft garlic cloves out of their skins.  Use the oil that you roasted the garlic in to season whatever your’re using with the garlic.  The cloves will keep, refrigerated in an airtight container, for up to 1 week.

BALSAMIC-ROASTED TOMATOES

6 plum tomatoes, halved
1 small red onion, tghinly sliced
2 tablespoons olive oil
1 tablespoon balsamic vinegar
1 tablespoon fresh rosemary
Sea salt and freshly ground black pepper to taste

Preheat the oven to 400 degrees F.

Place the tomatoes and onion slices on a baking sheet with sides.  Drizzle with the olive oil and vinegar, sprinkle with the rosemary, salt and pepper, and toss to coat.  Spread the tomatoes and onion in a single layer with the tomatoes cut side down and roast for 30 to 35 minuts, stirring occasionally, until the tomatoes are soft and shriveled and the vinegar has caramelized on the bottom of the pan.

I added a small amount of lettuce to this salad and served the dish with baked pita wedges.

Printable recipe

Pretzel Chicken Nuggets

February 25th, 2011
Mark Bittman’s new column in the New York Times was interesting this week.  He is taking on McDonald’s new breakfast option, oatmeal.  You can read his Opinionater column here.  It seems that McDonald’s has taken a healthy food like oatmeal and turned it into a nutritional nightmare.  Real oatmeal does not have any ingredients.  It is the ingredient, as Bittman says.  McDonald’s oatmeal has 7 ingredients, one of which is “natural flavor”.  You have to wonder why it is necessary to make everything so complicated.  AND BAD FOR US.
The same is true of Chicken McNuggets.  It seems it would be just as easy to cut up pieces of chicken breast, roll them in a coating and fry them.  But no, .  .  .   chicken is mechanically separated, turned into a pink goo, washed in ammonia, redyed and reflavored.  I think I will just make my chicken nuggets at home.
Here is a recipe that I adapted from myrecipes that has a twist on the usual coating for chicken pieces.  It was very tasty and the pretzels gave it added crunch.
PRETZEL CHICKEN NUGGETS
2 cups small pretzel twists
1/2 cup grated Parmesan
1/2 cup whole wheat flour
1/4 teaspoon pepper
2 large eggs
1 pound boneless chicken breasts, cut into 2-inch pieces
Preheat oven to 400 degrees F.  Coat a large baking sheet with 1 to 2 tablespoons of olive oil.  Place pretzels and Parmesan in a food processor and process until coarsely ground and well mixed.  Transfer to a bowl.
Combine flour and pepper in a separate bowl.  Beat eggs with 1 tsp. water in a third bowl.
Roll chicken pieces in flour mixture until thoroughly coated.  Dip in eggs, allowing excess to drip off.  Transfer to pretzel mixture and turn until thoroughly coated.  Place chicken on baking sheet; turn to coat with oil.  Bake, turning once until lightly browned, about 20 minutes.
To make it even better for you, serve the chicken nuggets on a bed of fresh salad greens.

My Father and the Story Behind a Family Name

February 20th, 2011
My Father, Michael Bobik, was a Marine who saw combat in World War II.  It was not just any combat.  He was a member of Rocky’s Raiders, a group of brave Marines who stormed the beaches of Guadalcanal in The Soloman Islands, north of Australia and south of Japan.  It was one of the first offensive moves of the United States against the Japanese.  It was important to secure the island for it’s airstrip so that we could be within striking distance of the Japanese nation.
My Father was 27 years old when he enlisted in the Marines.  He did not have to go to war because of his age, but he considered it his duty to serve his country.  On the Navy ship that took his battalion to Guadalcanal, he met a young 17 year old Marine private named William Cameron.  They became friends and Dad took him under his wing.  William was young and scared.  As the landing craft transported the Marines to shore they did not know what they would face.  My Dad winked at William and said “It will be all right kid.”  The landing was safe, but the jungles and mountains were formidable.  The heat and humidity were intense.  Shortly after they came ashore there were airstrikes on the American fleet by Japanese fighter pilots.  Several of our ships were sunk and the Navy pulled away from the area leaving our men on the island without rations and supplies.  For weeks and months they subsisted on rice and what rations they had.  Jungle combat with the Japanese was fierce and brutal.  In the end, they secured the airstrip and defeated the Japanese.  The movie, The Thin Red Line recounts the events that took place there.  I have seen it but do not want to see it again.  It is disturbing imagining what my Father went through.

William Cameron was killed in action on Guadalcanal.  The picture of my Father kneeling at his grave in Guadalcanal has been in our family album for years.  I remember looking at it as a young child.  After William’s death my Dad vowed that if he ever had a son, he would name him William Cameron Bobik to honor the memory of this young man who gave his life for his country.

This is my brother, William Cameron Bobik.  He served two tours of duty during the Viet Nam War.  Bill has much better hair than I do even though it is short in this picture taken during his time in Viet Nam.  Sorry, I just had to inject a little humor into this family saga.  I have always envied his full head of thick hair.  He is two years younger than me and I admire him very much.  Family is everything to him.

Bill’s son is named Paul Cameron Bobik.  I love his hair too.

Paul has three lovely children.  His son’s name is Seth William Bobik and one of his daughter’s name is Chloe Cameron Bobik.  Paul and all of the other grandchildren loved my Mom and Dad.  They were grandparents of extraordinary warmth.   It has become important to honor their memories.

Jennifer, Bill’s oldest daughter named her first born son Clay William.  Jennie lived across the street from her Grandparents and was a great help to them in their later years.  She also has great hair.  Damn!  Am I the only one with bad hair?

Morgan is Bill’s youngest daughter and the one responsible for posting all of the pictures of  my Dad and her Dad on Facebook;  again great hair.  She also lived close to my parents and loved them dearly.  When my son Michael was considering the name Cameron for his new son he contacted Morgan to ask her if she wanted to use it for any of her future children.  She graciously gave Michael her blessings.

So we have come almost full circle with the name.  It is a bittersweet story but I kind of like that we have linked my Dad’s name (which is also my son’s name) with William Cameron’s name.  Cameron Michael is the name of my new Grandson and a name that I am sure would please my father.  As my brother said,  “He is smiling at all of us from above.”  His legacy will be with us always.  Thank you Michael and Kristen for honoring him in this way.

Pasta Primavera

February 19th, 2011

We returned to Florida yesterday after an exciting week spent with the new parents and our, now, two grandchildren.  It was hard to leave them.  The weather in Cary had turned spring like the day Michael and Kristen brought Cameron home from the hospital so I made them a lovely and healthy pasta primavera.  After a week of takeout food and hospital food I thought it would be a welcomed change.

The recipe came from Giada De Laurentis.  Kristen has all of her cookbooks.  What I loved about this recipe was the fact that all of the vegetables are roasted first so that they have a nice caramelized flavor.  This can be done ahead of time.  Also there is no heavy sauce; just the olive oil and caramelized bits from the pan, the pasta water and the nutty Parmesan cheese.  The only addition I made to the recipe below was asparagus.  You can’t have a primavera without asparagus.

My thanks to all of you for your congratulatory comments.  The blogging community is truly a wonderful place.

PASTA PRIMAVERA

3 carrots, peeled
2 medium or 1 large zucchini
2 yellow summer squash
1 yellow bell pepper
1 red bell pepper
1 onion, thinly sliced
1/4 cup olive oil
1 tablespoon dried Italian herbs
2 teaspoons kosher salt
2 teaspoons freshly ground black pepper
1 pound dried farfalle pasta (bow-tie pasta)
15 cherry tomatoes, halved
3/4 cup shredded Parmesan cheese

Preheat the oven to450 degrees F.  Cut the carrots, zucchini, squash, and bell peppers into thin 2-inch long strips.  On a large, heavy baking sheet, toss the vegetable strips, onion, oil, dried herbs, and 2 teaspoons each of salt and pepper to coat.  Transfer half of the vegetable mixture to another large, heavy baking sheet, and arrange the vegetables evenly over both sheets.  Bake, stirring after the first 10 minutes, until the carrots are tender and the other vegetables begin to brown, about 20 minutes total.

 Meanwhile, bring a large pot of salted water to a boil.  Add the farfalle and cook, stirring occasionally, until tender but still firm to the bite, about 8 minutes.  Drain, reserving 1 cup of the cooking liquid.  In a large bowl, toss the pasta with the cooked vegetables to combine.  Add the cherry tomatoes and enough of the reserved cooking liquid to moisten.  Season the pasta with more salt and pepper to taste.

Transfer the pasta to bowls.  Sprinkle with Parmesan cheese and serve.

Printable recipe

© Penny Klett, Lake Lure Cottage Kitchen. All rights reserved.